August 2 Saturday. Marin Century. 124-, 92-, 100-, 61-, and 37-mile routes. $155-$90. Registration is open.
3 Sunday. Civilized Century. $71. 100-, 75-, 60- and 35-mile routes. Limited to 200 riders. The 100-mile route starts in Redwood City goes up to SFO and returns before crossing the Dumbarton and returning around the South Bay. Registration opens May 3. is open.
16 Saturday. Cool Breeze Century. $113. 125-, 107-, 100-, 65- and 27-mile routes. A pleasant, not-too-difficult century down in Ventura county with great weather. Registration opens April 1 (no fooling’!) is open. Limit of 2,000.
30 Saturday. Tour de Fuzz. $135-$115. 100-, 62-, and 32-mile routes. Similar road to the Wine Country Century and even starts at the Luther Burbank Center! You can preregister without payment to hold a spot; registration opens in March. is open.
September 6 & 13 Saturday. Ride The Rim. $10 suggested donation. 33 miles. The NPS closes part of the Rim Drive to cars on these two days. Registration is not open yet. open. Now that the NPS is devastated, will it have money to put on this event?
7-12 Sunday to Friday. Cycle Oregon Rally. 303 to 140 miles. $1,534. Cycle Oregon has revamped its tour. Now it’s a week doing routes in two towns, Prospect and Diamond Lake. Asphalt and gravel. Limited to 600. Registration is open. closed Aug. 28.
13 Saturday. The Bay Ride. 130 or 40 miles. $167. 135 miles around the Bay from the Ferry Bldg or just 40 from the Ferry Bldg. to Oakland via Marin. A fundraiser for the California Bicycle Coalition.
27 Saturday. Napa Valley Ride to Cure ALS. 102-, 72-, 57-, 44- , 40-, and 23-mile routes. $100 registration and $200 minimum fundraising. From downtown Napa a tour through the Napa Valley and Pope Valley. Registration is open.
27-28 Saturday to Sunday. Bike MS: Waves to Wine. $70 start fee. Ride from San Francisco to Rohnert Park. Minimum $350 fundraising. Registration is open.
Eroica California. Eroica California seems no longer to be offered.
27 Saturday. Fall River Century. 200k-, 100 mi-, 100k-, and 25-mile routes. $85-$55. Limit of 500 but 100 day-of-event registrations too. Fall River Mills is northeast of Redding, about a 4.5 hour drive from SF. Registration is open.
27 Saturday. Lighthouse Century. $120. 100-, 75-, 64-, and 40-mile routes. Limit of 1,000. San Luis Obispo Bicycle Club’s other century. From Morro Bay a detour inland before heading back to the coast and halfway up Highway 1 and back. Registration is open.
28 Sunday. Tour de Cure. $?. $250 minimum fundraising and your registration fee counts towards your minimum. 100k, 50k, and 6k routes. Rides out of HP in Palo Alto. Registration is open.
October 4 Saturday. Sacramento Century Challenge. $115-$65. 100-, 63- 36-, and 16-mile routes. Rotary Club fundraiser for at-risk youth. Registration is open.
4 Saturday. Best of the Bay. $185. 200 miles. Registration is open.
4 Saturday. Bike The Bridges. 100k-, 50 mi, 50k, and 25 mile routes. $110-$85. Fundraiser for Special Olympics NorCal. From Martinez across the Benicia and Carquinez Bridges. Limited to 1,000 participants. Registration is open.
11 Saturday. 3F Century. 100-, 62-, and 37-mile routes. $85-$65. If you prefer a flat ride in the Valley in Colusa and Sutter counties around the Sutter Buttes. Registration is open.
11 Saturday. Asti Tour de Vine. $105. 100-mile, 100k, 50k, and 25k routes. Rides in northern Sonoma county starting in Cloverdale. Registration is open.
18 Saturday. Foxy Fall Century. 100-, 100k, and 50k-routes. $110-$60. Fee includes one-year membership in Davis BBcycle Club. Limit of 1,500. Registration is open.
18 Saturday. Tour de Lincoln. 100k-, 50k-, and 25k-routes. $?. If Foxy Fall is too crowded for you, here’s a community ride just up the road in Lincoln. Their website appears to have been hijacked. Contact them through Facebook: https://www.facebook.com/TourdeLincoln/
18 Saturday. Ride Santa Barbara. 100-, 62-, and 34-mile routes. $180-$106. It’s a longish drive south but Santa Barbara is a great place to do a century with beach front views and fantastic climbs in the Santa Ynez Mountains including Gibraltar. Limited to 2,000. Registration is open.
November 15 Saturday. Death Valley Century. 100-mile, two 50-miles routes, and a 62k route. $181. Limited to 300 riders. Registration is open.
I’m fixing a hole where the rain gets in And stops my mind from wandering Where it will go —Lennon/McCartney
Inspect your work! You’re not done yet: you need to inspect the entire bead to make sure you have no part of the inner tube trapped under the bead. On the side of the rim where you inserted the spare tube, push the bead back from the rim—you should see no inner tube. If it is completely inside the tire, no part of the tube should be visible. Continue inspecting around the circumference of the rim. If you see some inner tube showing, make sure you have some air in the tube and then massage that portion of the bead to try to get the tube fully underneath. This may take a few seconds. Then continue until you have inspected the entire rim bead. Then inflate the tube with your pump with a few pounds of pressure. If you do have any trapped tube, some pressure may allow it to pop fully into the tire. Deflate and inspect again: go around the rim again and push back the tire bead to make sure no tube is showing anywhere. If you see any tube, go back to massaging it into place.
I want to emphasize how important this step is: if you have any tube stuck under the bead, you will explode your tire when you pressurize it enough. That section of trapped tube will inflate and there is nothing to restrain it and it will pop suddenly. If you’ve ever exploded a tire, you know it can be deafening especially if you do it indoors. Usually a tube will explode right away if you’ve pumped it up to full pressure. So make sure you have no tube trapped under the bead. Check it once, check it twice and don’t be in a hurry. If you explode your spare, then hopefully you have a second or you can patch your flat tube. Out on the road inflating your tire with a mini pump is less likely to explode your tire than CO2 because small pumps just can’t inject air very quickly and you are more likely to notice your tire bead bulging before it can explode. If you see it bulging, immediately deflate your tire and try to move the inner tube so that you can no longer see it under the bead.
When you’re confident you have no tube trapped under the bead, you can proceed with pumping up the tire. As you pump and the air pressure increases, you may hear snaps as the bead pops out of the well and onto the rim ledge. This is a good sign that the bead is in place. Usually if the inner tube is trapped, this can’t happen. You may hear several snaps as different sections of the bead pop onto the ledge. Sometimes you don’t hear any snaps. When the tire is pumped up firmly, you’ll want to check if the bead is truly in place. You can visually inspect it: just above the rim on both sides of the tire there is a small line molded into the tire sidewall. This line should be visible and about the same distance away from the rim all the way around. A quick way to inspect is to hold the wheel with both hands and spin it while looking head on at the top of the wheel. If you see the tire hop up and down it means that there is a portion of bead that still isn’t in place. In particular check any spots where the tire appears to hop up–this may be due to bead not being able to seat because part of the inner tube is still trapped under the bead.
Tire pliers
Sometimes the wheel needs just a little more time for the pressure to force the bead into place. If you’re doing the repair at home, you can let the wheel sit overnight. But if you’re not at home and on the road, not having the bead fully seated for the entire circumference is not a hazard as long as you are certain the tube is completely inside the tire and not trapped anywhere under the bead. It is now possible to ride with the wheel but you will probably feel the wheel hop everytime the wheel completes a revolution. Sometimes riding a wheel will help that final section of bead pop into place and the hop vanishes. If you have a really recalcitrant tire whose hop just won’t go away, there is a special tool–tire pliers–for prying that bead into place. (But it’s not portable.)
Before you start inflating the tube make sure that the valve is standing straight up. If it’s canted, it means the tube is pulled along the rim. You’ll want to straighten it because after inflation a canted valve puts additional stress on the rubber at the base of the valve and the eventually it will either tear or abrade open. If you can’t easily straighten it completely, you will have to undo the bead in order to shuffle the tube inside the tire.
If you haven’t already, you should now inflate the tire up to its usual pressure. Reinstall the screw-on retention nut if you had one. Then you can reinstall the wheel back on your bike and continue. When you arrive home, you can then repair the inner tube.
Topeak Morphe mini pump with gauge
Regarding pressure: most portable pumps do not have a pressure gauge to indicate how much pressure you’ve actually put in your tire. So you are flying blind and the best you can do is the “finger test”—pinch the tire and see if it feels like your tire usually does. This is a completely unreliable method of ascertaining the actual pressure. If you’re a real tire nerd, you’ll either have a pressure gauge in your saddle pack or you’ll have a portable pump with a gauge. If you’re less of a tire nerd but still want some assurance, here is something you can do even if it is a bit tedious: at home deflate your tire all the way and then pump it up with your portable pump using a gauge to tell you the pressure after a number of strokes. This is a good—perhaps too good—workout for your arms but in the end you will know approximately how many pump strokes you need to do to get your tire to your preferred pressure. This of course will be different for different size tires because the amount of air you need to inject will differ.
I’ve written before about this small metric century held in the small ag town of Linden, which is a few miles east of Stockton. You can read about the event here and here. It’s put on by the Community Center for the Blind and Visuallly Impaired in Stockton as a fundraiser for their tiny non-profit that provided needed services to people who are blind or have low vision. By today’s standards it’s also a steal at just $65 for the metric. (There is also a 25-mile route for $50.)
I’ve inadvertently turned into a champion of this ride and I mostly seem to be holding up a lamp in the darkness by myself as almost no one from the club seems to be interested in traveling 90 miles out of the Bay Area to do this beautiful ride. Why do I like this ride? I’ve mentioned before it harkens back to a much, much earlier time before centuries blew up and became mega events. It’s got a much friendlier and “in-group” feel because it’s so small, probably less than 300 riders all told. And this year I’m wondering if they got even that many.
This year was almost as good as last year: sunny and not a hint of rain. Although it was a tad chilly at the start I was shedding my layers by the first rest stop and it stayed warm the rest of the day making for a classic great day on the bike. Even the usual westerly afternoon wind was mild.
When I arrived at the start there was a bit of a crowd. I saw club jerseys mainly from the Stockton Bike Club, Davis, and Sacto Wheelmen, all Valley clubs. No club from the Bay Area was represented but I did see a couple of Marin Century jerseys. In the past there was a diversity of bikes represented—hella expensive to bicycle shaped objects. This year I noticed a lot more carbon and titanium. Are these frame materials getting cheaper? Or is the Pedaling Paths crowd getting more upscale? Being such a flat ride there were tandems and a recumbent or two.
By the time I had checked in and gotten my bike ready the start was almost deserted. Hmm. I did get a later start than usual, after 9 versus 8:30. But…
On the road there seemed to be fewer cyclists than in the past and I assumed it was because I was starting late. This ride comes early in the season and I’ve never done it at a fast pace simply because I’m not riding much in February. By this time though I’ve typically already got one metric under my belt—the Velo Love ride—so it’s not too grueling. Last year I had ridden almost nothing before the ride and I also had taken three weeks completely off the bike doing a car tour in New Zealand. That I survived that ride was a miracle even though I was deliberately going slowly and even using the granny on the short, rolling uphill stretches. This year I was doing better: January was miraculously dry and I got a lot of miles under my belt. But again I had a long break off the bike so approaching this ride I was again apprehensive that I wouldn’t be able to finish it without being shattered.
My strategy was the same as last year: try to go slow, stay zone 2 as much as possible, don’t chase wheels. As I’ve evolved into the Ancient Bicyclist I’ve been smitten increasingly by paralytic leg cramps. When I was younger this rarely happened and when it did it was on very hot days when I was riding really hard. Now it just happens when riding. Consequently I’ve had to up my game and actually pay attention to what I’m drinking, when I’m drinking, and—gasp!—holding back even though my body says go, go, go! Carrying Pickle Power juice has become a necessity. Gone are the days I do rides with just plain water.
All day I religiously plunked electrolyte tablets in my water bottle, drank a vial of pickle juice at each rest stop, drank my electrolyte fluid like a fish and lo and behold, no cramps. That isn’t to say I didn’t get tired. But at least I wasn’t writhing by the side of the road in pain with uncontrollable spasming.
The first miles are spent just due east of Linden, an area populated by large walnut orchards providing a pleasant canopy. I saw hardly anyone. A “young” man (he looked to be in his fifties) passed me as I stood by the side of the road drinking and asked me if I was okay. I ended up chasing him almost all day even though it wasn’t my intention. Before the first rest stop at mile 15 is a long southerly stretch. Again I hardly saw anyone, maybe six cyclists altogether. At the rest stop hardly anyone was there. Also unlike in the past there weren’t any PBJ sandwiches, just fruit, Clif bars, and mercifully, strong coffee! Maybe the registration was down this year?
I happened to leave the rest stop with two other oldsters—who looked younger than I!—who were riding just a smidgen slower than my pace heretofore. This was a godsend as I was getting some slight cramps in my feet and calves and was concerned I had blown it and I was heading towards full thigh cramps. So I tailed them for a while hoping the precramping would abate. At times they were pullling ahead of me. At an intersection I caught up with them and the woman asked me if I wanted to pass. I responded, “Not at all! I’m not sure I’m going to be able to finish this ride!” She said, “Me too!” But she was riding more strongly than I. Eventually they stopped to drink and I continued. Miraculously the foot cramps vanished and I felt much better. Even so I was deliberate about staying zone 2.
The southern end of this loop is cattle country and boy, did it smell like it! Although the fields were green they didn’t seem as lush as they did last year. Then I realized that all the grass had been chewed off to nubs. Oh right, cattle. Grazing fields butt up against huge cherry orchards that were exploding in a light pink. Cherry blossom season in Japan is in March but here the temperatures are so much milder that they bloom earlier. Sakura and cattle poop—can’t have one without the other it seems. The lunch stop was at 40 miles at the Milton cemetery. The ten miles or so beforehand is rolling and I saw no more than five or six other cyclists. Each little hill had me gearing down so I could spin as much as possible to forestall cramps. I took it easy on the short downhills. Even so I somehow managed to pass a few guys.
Lunch was different this year: instead of ham and American cheese on white bread, it was turkey and American cheese on white bread! Food like this hadn’t passed my lips for a year. But I was famished and gobbled it up like slop before a pig. (I hadn’t had any breakfast.) For salt it was Lay’s potato chips. It all hit the spot. More pickle juice just in case.
It was 26 more miles to the end and the next section promised a few more rolling hills. I saw not a single cyclist all the way to the last rest stop. All day traffic had been exceptionally light of both the car and bike kind. Even motorcycles, which love to race these roads, were a rarity. No punishment passes or crazy 80 MPH drivers this year. It was just quiet roads, beautiful and serene. At the northernmost point of the loop I hit another low spot: the hills were still short but even steeper, and the pavement was cruddy. I was getting tired. The longest ride I had done so far was just 43 miles. I just geared down, went slower, and took my time. Then it was back on the flats again for the run to the last rest stop. I finally saw some cyclists there. Had I caught up with the main group? I made a brief pit stop at the Porto-San and took off, just nine more miles to the end and more food.
I could smell the barn now, my legs still weren’t cramping, and I decided to speed up. I passed a guy who was dawdling and shortly thereafter I realized he wasn’t going to let me go and was trying to catch up. No matter. I passed about ten or fifteen riders and made it back to the start. Even though I had eaten lunch just a short time ago I was ready for more grub. As usual it was pesto pasta, focaccia bread, salad, and baked chicken. It was all good. But then I could have eaten shoe leather and thought it was tasty. The dining area was full, about 50 or so riders chowing down and gabbing. So I went next door to De Vinci’s restaurant and ate there alone. A fitting way to end a ride that saw me solo the entire day. And no cramps! Maybe I’m finally learning from all my mistakes.
Assuming it doesn’t rain I’ll be back next year assuming I’m healthy. But I’m wondering if CCBVI will put this event on again. The vibe is very cool and friendly but I know they’re not putting this on for the vibes. If people don’t register and donate cash, it’s just not a winner for them just as it isn’t for the SF AIDS Foundation to keep putting on Lifecycle. They could certainly do better marketing. This event is flying so under the radar that it’s hurting them. I know putting on a century ride is a huge undertaking so it better pay off well. And even if it pays off well there’s only so much volunteerism in your blood before you burn out. Hopefully there are others to whom the baton will be passed to carry on the hard work.
Planes. Japan has a very good but complicated transportation system that includes, intercity buses, trains, and of course planes. From the Bay Area the main direct airports are Haneda (HND) or Narita (NRT) near Tokyo or Osaka airport (KIX). Odds are your tour is starting somewhere else so you’ll likely need to get to your start town from either Tokyo or Osaka airports. Flying is generally easy but keep in mind that most intra-Japan or domestic flights from Tokyo originate at Haneda, not Narita. If you fly into Narita, you may have to transfer to Haneda to catch your connecting flight; Narita has a limited number of domestic flights. If you fly into Narita, you can transfer to Haneda either by train or limo bus. Keep in mind that clearing passport control, retrieving your luggage and getting through customs takes time. That will be true at Haneda too as you’ll have to go through check-in and security. The time it takes by train or limo bus is about two hours depending somewhat on Tokyo traffic (for the limo bus). So you’ll need to set aside about five hours to complete the transfer comfortably. If you can, it’s better to fly into Haneda instead of Narita if you plan to catch a domestic flight.
If you don’t want to rush, you can try a layover in Tokyo or at an airport hotel and proceed to your final destination the following day. A flight from SF to Tokyo is about eleven hours. If you tend to be exhausted after a long flight or perhaps you can’t relax and sleep on a Trans-Pacific flight, then a layover may make sense for you as long as you’ve set aside that extra day. We usually try to get to the destination city right away even though we may be tired. But we have done a layover in Tokyo and taken the Shinkansen—“bullet” train—from there to Kanazawa. One advantage of flying is that navigating the airport is much simpler than going into Tokyo to your hotel and then getting to a train station to catch a train.
Airport limo kiosk
By the way, the procedure for using airport limousine service in larger cities is usually to proceed to the stop where there will be an electronic kiosk for paying your fare and getting a ticket. (Be sure to have cash in order to pay.) When the limo bus arrives, you load your bags into the undercarriage before showing or giving your ticket to the driver and boarding. Depending on the route you may need to know which stop to debark from. But there is electronic signage and audio informing you of the next stop so you do not miss your stop. At your stop the driver and the ground assistant do not unload your bags and you will have to do that.
Airports in Japan function very similarly to airports here but there are a few differences. Here in the US almost all flights depart from a terminal. But as in Europe large airports in Japan often have flights that aren’t at a terminal jetway; instead you take a shuttle bus from the terminal out to the tarmac and board from the ground. This is important mainly because you’ll need to make sure you’re at the gate to catch the shuttle bus to the plane. If the last shuttle has departed from the terminal, you won’t be able to board your flight.
Airport procedures seem more efficient than in the US. Baggage handling and actual boarding are quicker. A half-hour between your arriving flight and a departing flight is not uncommon. Japanese airlines seem to have no problem boarding a full plane in about 15 minutes, which would be impossible here in the US. One time we were delayed in getting through customs and passport control and missed our connecting flight to Nagasaki. The next flight was in 20 minutes and it was the last one for the night. We checked our luggage and sped through the airport to a shuttle bus that took us to a different terminal. We arrived at the gate literally at the last minute before the scheduled departure and we got into the tail end of the boarding line. They shut the door behind us and we took off. Our bags arrived with us too. The shuttle driver clearly knew what he was doing!
Security in Japanese airports is similar to here except that there is no TSA Pre or Clear—everyone has to go through the same rigorous procedure including removing shoes, all laptops from carry-on, etc.
Trains. The railway system can be complicated because there are many independent train systems that serve local areas. For getting to and from major cities and towns it’s fairly transparent because they are served by one of the Japan Railways (JR), which were formed when the national railway system was privatized decades ago. Japan also has high speed rail, the Shinkansen, which can be faster than taking a regional flight because you don’t need to check in early nor go through an extensive security check. The Shinkansen trains, or ‘bullet’ trains, go about 180 MPH and are very smooth. Another advantage of taking the train is that train stations are in the center of towns whereas airports are usually on the outskirts. Train tickets can be ordered from the railway system in advance or you can buy one when you get to a station. Usually you can buy a ticket at a kiosk or in person at the railway office if it’s open. Be careful though: Japan is mainly a cash based society and foreign credit cards are not always accepted. This is changing since the 2020 Olympics. The kiosks can be faster than the office, which often have lines, but not all of them accept credit cards and definitely some do not accept foreign credit cards. If you use one, you can select English so that the entire transaction is understandable. Train usage in Japan is very high so purchasing a ticket in advance especially for the Shinkansen is advised as it can sell out. Rail stations are often centers of commerce as well. They are filled with businesses—restaurants, stores, food stalls, electronics stores, etc. so they are rife with services if you need something at the last minute.
Bullet train: 186 mph, baby!
As in the airports electronic signage for departures and arrivals is in Japanese as well as Roman script so you will be able to read them and know when the train arrives and on which track. Railway staff rarely are able to communicate in English.
Trains in Japan are punctual. They arrive and depart on schedule almost all the time. The rail system is about as efficient as in Switzerland. Train usage is very high in Japan. As with just about any place in Japan trains are marvelously maintained and clean. There are luggage bins as you enter the trains where you can stow your luggage before seating. Don’t worry them being stolen. As in Europe you select and purchase a specific class of ticket and you’ll need to make sure you sit in a car that is that class.
If you’re concerned about getting a seat on a train, you can purchase a ticket in advance for a reserved seat. However JR (Japan Railway) will not send the ticket to you and you’ll have to pick it up at a JR office either at the airport or at a station. If you want to have the ticket sent to you in advance, you will have to use a third party service to do that. The advantage of using JR directly is that you can select your seat, which you cannot do with a third party site. (The latter will select a seat for you.) Purchasing a ticket in advance for the Shinkansen is recommended!
About the Shinkansen. If you’re heading to a start town from Tokyo or Osaka, the bullet train is a viable option to catching a connecting flight. Grabbing a connecting flight at Haneda to your start location is so easy that you aren’t likely to entertain taking a train instead. However if you are planning to visit Tokyo before your cycling adventure, then consider taking a train instead of heading back to the airport. For a detailed and clear explanation about using the train system and buying tickets go here. There are just a couple of remarks I will add that aren’t mentioned in the above link. If you are bringing your bike you may not want to use the train. Not only is lugging a bike box/case around a burden in Tokyo but bringing luggage on trains is limited to no more than 160 cm (= 63 inches) for combined height plus width plus depth. Your case might be too big. An option is to leave your bike at a luggage storage facility at a train station to avoid dealing with it in Tokyo. But this won’t solve the size issue. If you’re using a S&S case you should have no trouble taking your bike on the train assuming there is space in the luggage storage bins in your train car. You can bring your bike on trains in Japan (and some buses) as long as you use a rinko bag though if you’re arriving in Japan by plane it’s unlikely you’ll be using just a bag to ship your bike. But this is useful if you plan to use trains during your cycle tour. For information on how to rinko your bike, go here. For rinko supplies including bags go here.
Entering the train system is much like entering BART: put your ticket in the slot in the automatic gate, it opens and you enter, and then retrieve your ticket. If you are taking a Shinkansen you will receive two tickets when you buy them, one ticket is the base fare ticket and the second gives you access to the Shinkansen. When you first enter the station, you just put in your base fare ticket. Once inside you enter a second set of gates to enter the Shinkansen area. Here you put in BOTH your tickets as the same time—not separately—and retrieve them on the other side. The automatic gate will read them both at the same time.
In town. Towns where tourism thrives such as Kanazawa or Hiroshima or any big city such as Tokyo or Osaka have very well developed public transportation systems. Usually you can purchase a one-day ticket that lets you hop on and off buses and light rail so you can tour the town at will. You can purchase a ticket at the Tourist Information offices.
Typical taxi
Taxis. I can’t recall if we have ever seen an Uber of Lyft in Japan. But we have seen many taxis. Taxis in Japan are operated very professionally. Drivers are well dressed and always—as do bus drivers and train operators—wear white gloves. In the big cities taxi drivers are familiar dealing with Western tourists even if they can only speak Japanese. If you’re heading to a well-known hotel, they will probably know exactly where and how to go. If you have the address, you can show it to the driver. If you’re heading from a hotel to a location, you can ask the front desk to summon a taxi at a specific time and tell them the destination. That will be conveyed to the driver so you don’t need to be concerned about communicating with the driver. As in restaurants—really everywhere in Japan—you do not tip taxi drivers.
Safety. The biggest crime in cities is pickpocketing but it doesn’t seem to be anywhere at the level you’d find in Europe or the US. Armed robbery and mugging are very rare. On tours we’re mostly in the countryside and smaller towns where the level of crime is even lower. We’ve never had a problem leaving our bicycles outside a shrine, restaurant, public toilet, or shop and not locking them.
Starting a ride in a city. Japanese cities just as here and in Europe can have dense car traffic and it’s only when you get outside the urban center that roads calm down and you can relax. There are usually recommended bike routes to get in and out but as here it’s often a “bike route” i.e. just painted lines on a road that has no additional shoulder or room to accommodate cyclists, as opposed to a bike lane or bikeway. Despite how hectic traffic can be in some Japanese cities, the speed is often low and drivers are more attuned to cyclists due to how common it is to cycle to run errands in Japan. As mentioned before riding on sidewalks is acceptable in Japan especially if there is an explicit sign allowing it. Riding in the road and then jumping up onto a sidewalk or multi-use path when necessary is common in Japan. Despite the very well developed train network in Japan it still has a huge amount of lorries hauling goods everywhere. Even though they are smaller than the trucks in the US, the roads are narrow and they can appear very intimidating. Although they may seem to driving very close to you they know to pull out as they pass you to give you space. If they can’t pass, they will slow down and wait until they can.
I’m fixing a hole where the rain gets in And stops my mind from wandering Where it will go —Lennon/McCartney
After removing the embedded sharp object(s) from your tire, now you can consider installing your spare tube. Hopefully you’ve stored your spare tube carefully in your saddlepack/fannypack/Camelbak. Most likely your spare tube is made of butyl rubber, which is the most common kind. Butyl rubber can abrade easily and it also ages and can then crack. If your spare tire doesn’t have something covering it such as the cardboard box it originally came in, a sock, or a baggie, the tube can develop a leak just from the constant rubbing and jostling where it’s stored. If it is stored tightly such as in a tool wrap it’s less likely to move around and be abraded. I mention this only because you now need an intact, functioning spare. Finding out your spare tube has a hole when you’ve got a flat on the road is exasperating. For that same reason it’s wise to keep a pristine spare, i.e. one that hasn’t been patched before unless you are utterly confident that it has been patched perfectly and has been stored safely.
This may seem obvious but your spare tube needs to be one that fits your wheels. If you’ve got regular road wheels—700c—then you want to have 700c inner tubes; if you have 650B wheels, then your spare must be either a 650B or 26” tube.The diameter of the tube is also important as they come to fit different diameter tires. It is sometimes possible to stuff a slightly larger tube into a smaller wheel in an emergency. But you should replace it with the proper size tube when you’re back home. For example an inner tube for a 700×25 mm tire is not going to be big enough to be used safely in a 700×50 mm tire because the tube is so much smaller and may not be able to be inflated safely to fill a much larger 50 mm wide tire.
If you have Presta valves on your wheels, make sure you pack a spare with a Presta valve as well. Why is this? This isn’t due of your pump because almost all portable pumps have fittings that will fit either a Presta or Schrader valve. (But check your portable pump to be sure.) It’s the rim: the hole in the rim for the Presta valve has a smaller diameter than for a Schrader valve. If your spare has a Schrader valve, it will only fit through a rim hole designed for a Schrader valve. If you have a Schrader valve on your flat tire, installing a spare with a Presta valve is probably fine for getting home. The Presta valve will fit through the rim hole but it won’t fit snugly even if you use the nut that comes with some Presta tubes. When you get home you’ll want to remove the spare and install an inner tube that has a Schrader valve. Between the air pressure and enough movement through time the base of the Presta valve eventually will get worn through and you’ll get a leak at the rubber base of the valve.
Side note: if you have a rim with designed for Schrader valves, you can install an adaptor—a special small O-ring—so that a Presta valve will fit snugly. This is mainly used when you’re converting over from Schrader to Presta and want to keep your rim.
Did you know that the Presta valve on tubes comes in different lengths? Make sure that yours is long enough so that the valve sticks out of the rim enough that you can attach the head of your inflation device. Back in the day rims came in only box section shape and valve length wasn’t an issue. But now with aero shaped rims of varying depths you need to make sure your spare tube has a long enough Presta valve. If your valve is too short, you won’t be able to pump it up. Another option is to use or carry a Presta valve extension. You have to remove the original Presta valve core in order to use it though and that requires a small valve tool or pliers.
What about a spare latex or TPU tube? Perhaps you’ve thought about carrying a spare latex or TPU tube instead of butyl rubber. Latex tubes are lighter than butyl although the very lightest butyl tubes are about the same weight as the heaviest latex tubes. The reason to use latex tubes is because they are noticeably more supple than butyl tubes and thus more comfortable. However they are more expensive and can be more difficult to repair. There really is no advantage in using one as a spare. Latex tubes also come in limited sizes whereas you can get a butyl tube in any size. TPU tubes are newer on the scene. They are really much lighter than butyl tubes usually weighing just 40 or so grams. (Butyl tubes run about 75 grams and up.) These are also harder to repair but they are so thin and compact that you can fit two TPU tubes in the space that one butyl tube in your saddle pack. So for that reason they are worth considering as a spare tube. They are very expensive, running about $35 and up per tube. In general it’s better to have a butyl tube as a spare because they are cheap(er) and easy to repair in case you end up having to patch your spare on the road. (But if you are carrying two TPU tubes, the chances of getting three (!) flats on a ride are very small.)
There is really no advantage to having a latex spare. Butyl tubes of course weigh more than latex but as a spare it’s not rotating weight sitting in your saddle pack. So essentially it doesn’t make a difference. Butyl tubes do pack down a bit smaller than latex tubes. If you have to repair a flat, you’re better off having a butyl tube because they’re slightly easier to repair on the road. TPU tubes not only are very light but successfully patching a flat TPU tube while on the road is questionable.
Before you put the spare tube in your tire, make sure the large tire label on the sidewall is over the rim hole. This isn’t necessary for the function of your wheel; it’s just the traditional way to make it easy to find the rim hole when there is no valve: just look for where the label is.
Installing your spare inner tube in a tubeless tire. If you have a tubeless wheel that you’re putting the spare into, you’ll first need to remove the tubeless valve because it blocks putting in the valve of the spare tube. The valve on a tubeless rim is held in place by a nut on the outside. Depending on how tight the nut is you may be stymied. Remove it and save the valve for reinstallation later. If you are unable to remove the valve by hand, then you’re stuck. The problem with the tubeless valve is that the nut has to be screwed on tightly enough in order to seal the rim hole that the valve goes through. But you may have to tighten it so tightly that you will have difficulty unscrewing it by hand later on. Of course the answer is “don’t do that”. But sometimes you won’t get a good seal without tightening it hard. You can carry a small wrench or pliers to help unloosen the nut such as this.
Installing your spare tube. You’ll want to put the valve of the inner tube through the valve hole and start carefully placing the tube in the tire cavity. It may help to inflate the tube slightly to give it some form and make it easier to manipulate. If you’re putting the spare into a tubeless tire, don’t worry about all the sealant. It’s a mess that you’ll clean up after you’re home. It does help to have a rag or paper towel to mop up any spilled sealant. Once you’ve got the tube more or less completely in the tire you can start putting the tire bead back into the rim.
It is generally recommended that you start installing the tire bead at the section of the tire that is opposite the valve hole, i.e. the tire bead at the valve hole will go in last. If you haven’t already, you may find it easier to install the bead if the bead that was left on the rim is pushed off its rim ledge and into the rim well. With the bead in the rim well you may have slightly more slack than if you left it sitting tightly against the rim. This will depend on your tire: if you’ve demounted this tire before and gotten it back on without too much effort, then you can be pretty sure it will go back now and you can skip this step. But if you end up struggling to get the bead back on the tire after you’ve put in the tube, then consider pushing the other bead into the rim well and seeing if that makes it easier.
When the tire bead isn’t too tight. If you have experience with this tire (or at least this brand and model of tire) before and you know or suspect that the bead isn’t super tight, then do this: after stuffing the spare tube in the tire carefully, using both hands go around the rim and push the bead inside the rim. You can either do this with both hands at the same time, i.e. the left hand moving around the rim clockwise pushing in bead and the right hand moving around the rim anticlockwise pushing in the bead OR by keeping one hand still. You somehow have to prevent the bead from popping out of the rim so you have to restrain it in place while you push more bead into the rim. Though if you do the latter, you will have to continue past the valve hole to your other hand. By using both hands at the same time you’ll end up at the valve hole. When you start pushing the bead into the rim it will go easily. But as you continue it will get progressively harder as the slack vanishes. Hopefully by the time you get near the valve hole you have enough hand and thumb strength to push the last section of bead over the rim.
When the tire bead is tight. You’ll know you have a tire with a tight bead if you are struggling to get that last section of bead in and just can’t. At this point you’re probably thinking of using a tire lever. But try this first: stand the wheel up with the valve hole at the bottom and then stand over the wheel and have each hand pinch the tire so that both beads are forced into the rim well. To keep the beads in the well as you work down to the valve maintain downward pressure on the beads working towards the ground with each hand moving around the rim in opposite directions as described above. Hopefully this will keep both beads in the rim well and provide more slack so that you have enough hand strength to push it in. If your tire casing is rather stiff, the tire will be pushing the beads outward and they are more difficult to keep in the rim well. You will need to apply a little more pressure with your fingers to pinch them so that they can go into the rim well. Less expensive tires tend to have stiffer casings.
The last bit near the valve hole, usually about 10-12 inches of bead, is the hardest. If you have sufficient hand and thumb strength, you will be able to slowly get that last bit in. There are some tricks that make this easier. For tubeless rims, having sealant on the rim actually can help lubricate the bead and make it slide more easily onto the rim. For non-tubeless rims talcum powder also acts as a lubricant to make the last section of bead go over; but you’re unlikely to carry talc with you. Another good on-the-fly lubricant is Windex or just soapy water. (That’s for repairs you’re doing at home.) Or you can try a little water from your water bottle.
While you’re doing this you want to make sure that the tube is completely inside the tire and none of it is getting caught between the bead and the rim. This is where having some slight inflation in the tube to give it form will reduce the likelihood of a part of the tube getting caught. If you do catch some of the inner tube, you can pull the bead back a bit and start that section over and massage it. It is possible to ignore it for now and deal with it after you’ve got the bead completely back on. But it’s usually easier to fix it now when you have more slack in the bead.
Tire jack
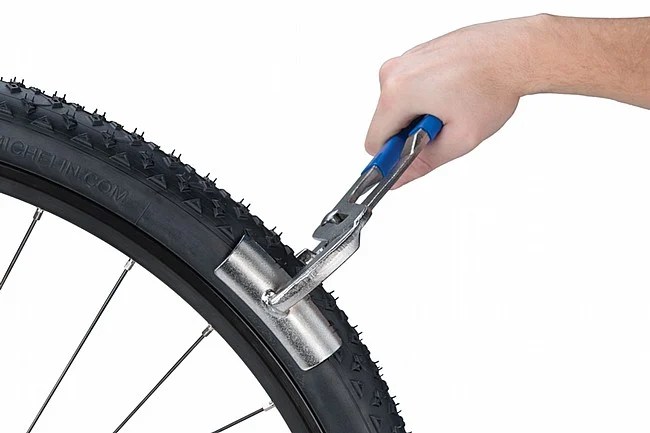
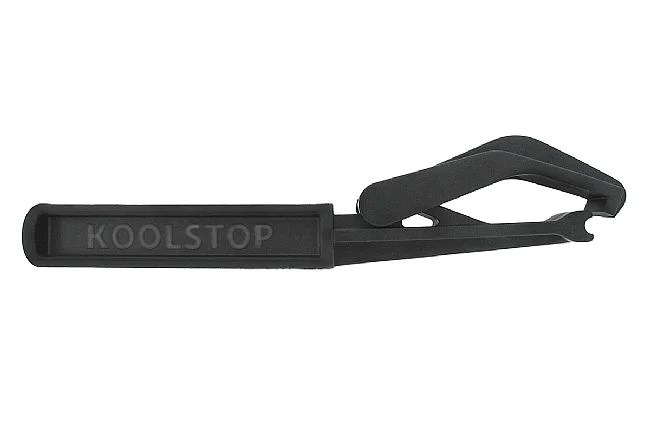
If you have tried as hard as you can and you can’t get the last part over the rim, then hopefully there is another person who can help you. If not then you’ll have to resort to using a tire lever. This is dangerous because it’s very easy to pinch the tube with the lever withour realizing it. You may get the bead back on but now you’ll have another flat. You’ll have to carefully insert the lever under the exposed bead trying not to catch the tube. Again inflating the tube very slightly to give it a round form helps but not so much air that the tube wants to bulge out. I can’t overemphasize the importance of not pinching the tube with your tire levers! If you do, you’ll almost certainly puncture the tube. As mentioned earlier there are some tools—tire jacks—that can help avoid this. The most common is the Kool Stop Tire Bead Jack. The basic idea of bicycle tire jacks is an increased lever arm with a hook that goes under the bead. That bigger lever allows you to exert enough force to lift the last bit of bead over the rim. Since the hook is small it doesn’t trap the tube. However the Kool Stop is a bit too long to carry conveniently on your bike (unless you have storage such as a backpack or a frame bag. A smaller, easier to carry tire jack is the EZ Clincher but being shorter it has less leverage. Obviously if you have such a tool with you, use it. Otherwise try to use hand/finger strength alone to get the last bit of bead over the rim. If you keep having difficulty, try going back with both hands and pushing both tire beads into the rim well at the opposite end and slowly working back to the valve opening; that may give you just enough bead to be able to use your hands alone to get the job done.
Assuming you’ve accomplished this, then push the tube valve up into the tire and pull it back down so that that portion of tire bead seats correctly in the rim.
A note about tire beads: The tire bead has to be very strong to contain the tire casing from literally blowing off the rim. They are either made of wire or Kevlar. Tires with the former are heavier plus they cannot be folded as compactly as a tire with a Kevlar bead. There is one other difference between the two that doesn’t often get mentioned: in my experience tires with Kevlar beads are sometimes harder to mount than a tire with a wire bead. You may read online that this is exactly the opposite–wire beads are harder to mount–but that is not my experience. I am surmising that Kevlar beads must stretch more when under pressure and thus they are made slightly smaller whereas a wire bead has essentially no stretch. That slightly smaller diameter in Kevlar beads is what makes them more difficult to mount.
Dynaplug tire plug kit
About tubeless tires and flats. By the way, if you have a flat in your tubeless tire and the sealant won’t seal the puncture, before you attempt to install a spare inner tube you should try to fix it with a tire plug such as a Dynaplug. You stick the plug into the hole so that the puncture is reduced in size enough for the sealant to coagulate around it. If one plug doesn’t do it, you can try to stick in a second plug. Putting in a spare tube involves quite a mess because of the sealant. In addition tubeless tires are definitely on the tight side and you will likely have a hard time demounting its bead and then getting it back on the rim. If tire plugs fail or you don’t have a tire plug kit, then installing a spare would be the next consideration. Using a tire plug tool—even the Dynaplug—takes some practice. The tool is usually larger than the puncture and so you must force the tire plug through the hole.
Arrival and checking in at reception. When you arrive at a hotel or inn, the staff are supposed to inspect your passport and make a record of it. If you are traveling not as part of a group, this would certainly be true. Our experience being part of an organized tour group is that this varies. Sometimes reception will ask to see and make a copy of your passport but sometimes this does not happen. This may be because the tour company has provided that information in advance and the staff feel they do not need to verify it when you arrive. But you should have your passport ready when you arrive at the hotel to check in just in case they don’t have it yet. The guides will tell you if you need to show your passport to the front desk.
By law when you travel in Japan you are supposed to have your passport on your person at all times. In reality we often leave it in our luggage in the support van. Other than when checking into an accommodation we have never needed to present a passport while traveling in Japan. But the police have the right to ask to see it.
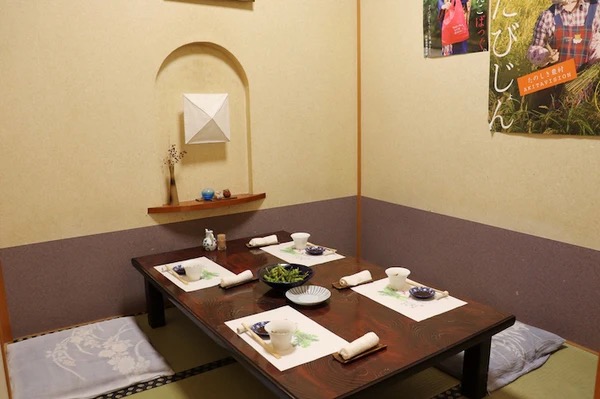
Rooms. Some hotels in Japan may offer a choice of Western or traditional Japanese rooms. However even if you prefer a Western room, there may not be one available that night. A Western room is what we would term a regular hotel room: beds, carpeting, a desk and chair, etc. Japanese rooms are what you might find in a traditional Japanese home as in the picture above: futons not beds, a low table called a zataku rather than desk, legless chairs called zaisu for the low table, sliding washi paper doors to enclose the main room, and perhaps a separate sitting area with regular chairs and small table (hiroen). There is always an alcove (tokonoma) with decoration, often a scroll or painting. Hotels catering to business travelers often have Western rooms; resort hotels may have only Japanese rooms or maybe just a few Western rooms. Ryokans usually do not have Western rooms, which means that you will be sleeping on a futon rather than a bed. A futon is similar to a mattress but much thinner and consisting of dense batting.
Futons with comforters on tatami floor
Futons are kept in a closet and put out by the staff while you’re at dinner. They are then stowed in the closet the next day. You won’t be able to lounge on your futon during the day since it won’t be out when you arrive. You’ll either have to sit at the low table or in the sitting area. If you expect to get “work” done on your laptop, there isn’t a convenient desk to use and you’ll have to make do with the small or low table or your lap. Because futons are thinner and denser than a mattress and there are no springs, they feel quite different. Some futons are thinner than others and they may feel hard to you. Your back may or may not like sleeping on a futon. On thinner futons your hip, shoulder, or lower back bones may be uncomfortable due to the minimal cushioning. If your futon is just too hard, you can try taking a spare futon from the closet and stacking two (or three) together to make it softer. Traditional Japanese futon pillows are smaller, denser, and less comfortable than the foam or down pillows we’re used to. They are stuffed with buckwheat hulls usually. If you find them uncomfortable, you can stuff some of your clothing in a sack to use instead. Also getting up from a futon takes more effort than a bed since you’re on the floor—you can’t just slide your legs off the bed and rise. If you’re next to the low table, which is moved by the staff from the center of the room to the side when they make up your futon, you can brace yourself against it to help getting up. Some ryokans have a piece of small furniture that looks like a freestanding armrest for a zaisu. This is intended to help you get up from the floor. Finally, futons have comforters, which you will welcome in cold weather but can be too hot in warmer weather (well, at least for me).
Japanese rooms have tatami flooring so you’ll need to remove all shoes while in your room; it is very rude to walk on tatami with footwear of any kind as it soils and degrades it. So you are either barefooted or in socks while in your room. In Japan cleanliness is highly valued.
In some ryokan or minshuku (small, private guesthouses) there may not be a private bathroom. The toilets and sinks may be in a common area. If you’re in the habit of waking in the middle of the night to use the bathroom, you may find this inconvenient. But many have en suite toilets. Ryokans with an onsen may omit a private bath/shower in which case you’ll have to use the onsen to shower up at the end of the day’s ride.
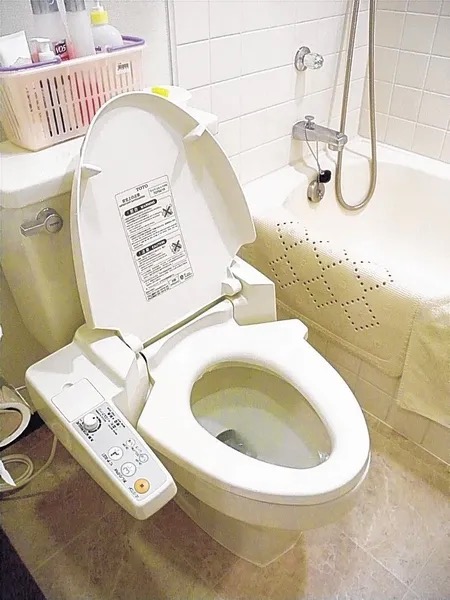
Bathrooms. Bathrooms run the gamut at inns in Japan. A lot of hotels with Western rooms have all-in-one bathrooms, i.e. bathrooms that look manufactured as one whole unit and then retrofitted to a hotel room. In actuality these hotels are certainly new enough that rooms were constructed with a bathroom in mind and I guess a smart manufacturer must be building them specifically for hotels trying to minimize the square footage in the hotel room. These bathrooms are typical Western bathrooms just smaller. They contain a sink, toilet, and bathtub/shower. Everything is tightly squeezed in. Showers sometimes have no curtain; this isn’t too surprising because showering/cleaning in an onsen there are no curtains or barriers to contain the spray. Some bathrooms that have no tub and you just shower on the floor, which has a drain. These bathrooms always have a stool and a bucket, which is what you’ll find in an onsen. Some hotels and ryokans have separate rooms for the toilet and the bath/shower not unlike what you’d find in old Victorian flats in San Francisco. At ryokans these toilet rooms often have toilet room slippers, i.e. slippers left in the toilet room and used only while you’re in there. They are always a different color than the slippers provided in the room and to make things glaringly clear they are marked “Toilet” for the ignorant Westerners. Since in a traditional Japanese room with tatami flooring you’ll be padding about in either bare feet or socks, toilet slippers make sense in order not to soil the rest of the room.
Toilets. Toilets in Japan are similar to bidets; there have an electric powered water jet to wash your bottom and then blow dry it; toilet seats are often electrically heated. If you are not familiar with the style of toilet, you’re in for a surprise if you accidentally activate it! Because the control panel and/or remote control is in Japanese, it can be very intimidating for the novice and you’ll probably avoid using it. However use Google Translate to decipher them or see this link and this link. And yes, there is toilet paper too. Japan also has “squat” toilets similar to what you’ll elsewhere in the world but these are never in hotels or ryokans. Some restaurants and bars still have squat toilets; some public toilets are squat but the number seems to be decreasing as they are replaced by newer toilets.
Like much of the rest of the world, you won’t find plush terrycloth towels in Japanese inns (but some high end hotels do have them). In my experience Japanese towels are adequate although sometimes they’re a little smaller than in the US. If the hotel or ryokan has an onsen you will find towels in the closet or armoire in your room rather than the bathroom, one large towel and one small one for each person. These are to be used at the onsen and brought back to the room.
Typical Japanese toilet
In ryokans your room will often include either an electric teapot or a carafe of hot water for you to make green tea, which is kept in a container on the zataku. (Sometimes they are placed in the tokonoma.)
Screenshot
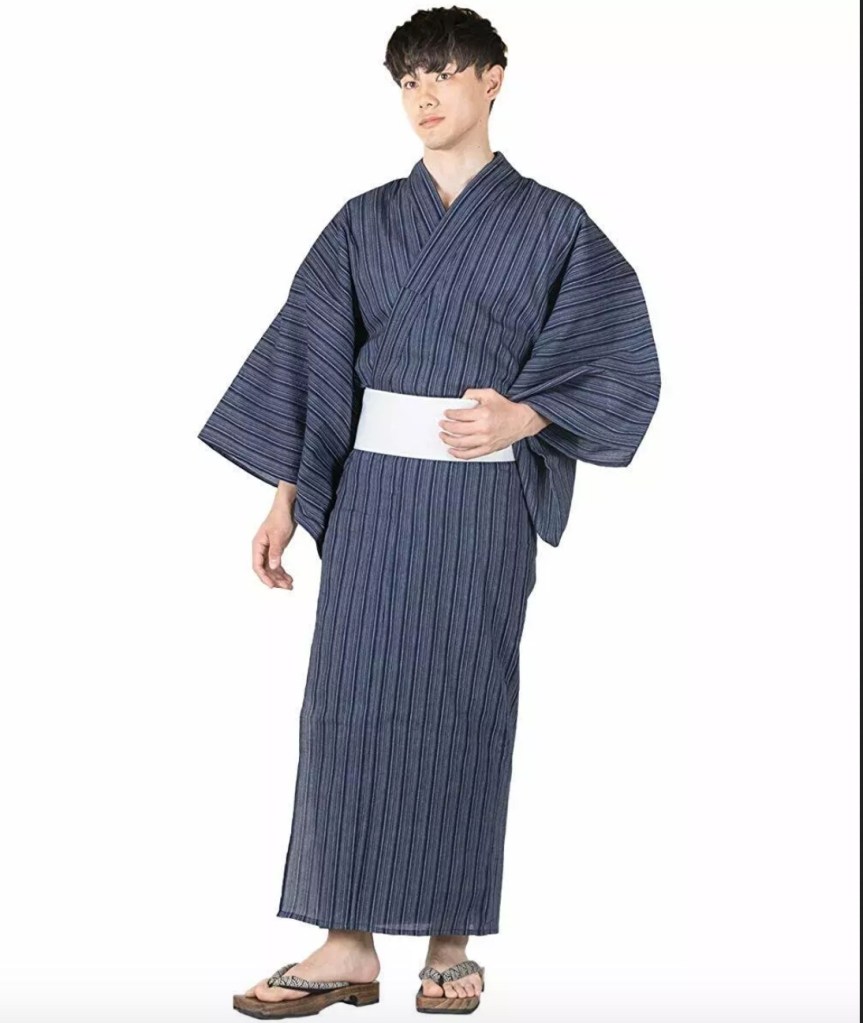
Yukata. Ryokans and most hotels include yukata robes. Usually they are in the room when you arrive. However at larger onsen hotels, i.e. you may have to select your size yukata in the lobby. A yukata is a floor length robe with a sash that you wrap around your waist (twice) to hold the robe in place. The proper way to dress yourself is to put the right side of the robe under the left and then wrap and tie the sash to the right. (Note that putting the right side over the left is only done for the deceased.) In colder weather there is a jacket you may put over the yukata.Yukata resemble bathrobes but their function is for casual lounging of any sort. Walking around the premises and even on the street in a yukata—especially if it’s a hot springs town—is accepted. Going to your meal in the hotel or ryokan in a yukata is common. Yukata come in different sizes, usually small, medium, and large; if the one in your room doesn’t fit, you’ll have to ask at reception for a different size although some places have only one size. If you don’t select a yukata in the lobby, it will then be in the closet along with any things needed at the onsen (if there is one). You can find more detailed information at this link.
Slippers are at the entrance of the ryokan but in hotels you will find them in your room. You don’t wear your regular slippers in the toilet room (nor in a Japanese room at all!) nor go in barefooted. Use the toilet slippers. If the toilets are down the hall, you’ll always find toilet slippers there for your use. Slippers in ryokans and hotels tend to be on the small side for Americans males. If you’re a size 10 or above, you should plan to pack your own slippers or flipflops unless you enjoy cartoonishly clomping along in tiny slippers. You can probably walk around in your socks or barefooted in the ryokan although I must admit that I have never seen Japanese do this. In hotels you are allowed to wear shoes even into your room unless it has tatami mat floors. But even in hotel rooms without tatami you will find slippers in your room for your use. Ryokans are another story. I have yet to stay at a ryokan or minshuku that allowed street shoes or cycling shoes to be worn indoors. When you arrive you’ll find slippers at the front door. Usually there is a step or two up to the ryokan floor and that’s where you are expected to take off your street shoes or cycling shoes and leave them there. There is usually an area with cubby holes to park your shoes for your stay; there is absolutely no reason to bring your cycling shoes into your room. If you plan to change into street shoes to go explore the area or head to a konbini, you should bring them to the front door and change into them there and leave them there when you return.
Onsen. Onsen are hot spring baths and Japan being a country with a lot of volcanic activity they can be found everywhere. There are onsen towns, destinations where Japanese people go specifically to take the baths. Hotels and ryokans can have onsen facilities too as hot spring water is often piped into the buildings. What we typically think of as hot springs in the US are not the same as onsen, as the former are usually not developed and are almost always outdoors in remote areas. Onsen are usually quite developed as the volcanic water is tapped and piped into facilities throughout an onsen town. Onsen can be indoor or outdoor but are usually indoor. Whereas a hot springs is considered an unusual luxury in the US, onsen are quite common and a big part of Japanese culture. This isn’t too surprising as baths were public faciliies for most of Japan’s history. Onsen have separate bathing areas for men and women. This is because you are expected to be naked in the onsen. Do not wear swim clothes in the onsen! If you’re uncomfortable being in public naked, onsen are not for you (which is a problem if your ryokan doesn’t have en suite showers.) There are typically set hours when you can use the onsen. They are closed for cleaning every day.
There is a whole ritual for using the onsen that I won’t explain in detail. But after disrobing and storing your clothing, room key, etc. you enter a bathing area adjacent to the hot water. You are expected to clean yourself well before you enter the pools. Going directly in the hot pools without bathing is deeply frowned upon (and yet I have seen Japanese do it!). Typically you clean yourself on a stool in an open stall; there might be a standing shower also. There is a bucket you fill with water to rinse yourself after soaping up. But I just use the hose from the tap to rinse. This is not an area where you horse around (also frowned upon). A more detailed explanation can be found at this link. After cleaning up you can enter the pool(s). If there is one pool it will be somewhere around 104-108F; multiple pools will have different temperatures. In my experience the pools are all tiled nicely, shallow, and some have steps you can sit on. Keep in mind the water is hot spring water so it will have almost always have a distinct mineral smell. The pools are not deep—they aren’t for swimming or even full immersion: when sitting on the bottom your head is above water. The idea isn’t to immerse yourself fully—keep your head above water. You spend as much time as you want in the pool(s) and then usually you get out, rinse off, and towel off before you leave the bathing area to get dressed. Your onsen ‘kit’ will include a small towel, about dishrag size or smaller. This you can use to wash yourself and “dry” yourself before leaving the pool area for the dressing room. When you get in the pool you place this small towel on top of your head for “storage” (or so I am told).
Using the onsen after a day’s ride is a great way to warm up if it’s been chilly or raining and they really help you recover from the ride in addition to helping you relax. A beer afterwards probably helps too! (You should not drink alcohol before entering the onsen.)
Won’t be allowed in onsen!
One thing you should know about onsen: tattoos are often forbidden. If you’re heavily inked this is potentially a problem and you should ask the guides or staff at the onsen. This is perhaps more an issue at a public onsen than at a private onsen at your accommodation. Tattoos are frowned upon at onsen because of the association of ornate tattoos with membership in a yakuza, Japanese crime syndicates.
If you’re at an onsen town (as opposed to an onsen that is part of your accommodation), you’ll have to walk to the onsen and pay a small fee to use the onsen unless the fee is already part of the tour. You’ll probably walk there in your yukata along with the towel and small towel from your room.
Heating and cooling. Japan can be very cold in the winter and very hot and humid in summer, which incidentally make spring and autumn the more comfortable times to do a cycling tour. Japan doesn’t have a native source of oil or gas for energy and relies completely on imported oil. The other major source of electricity is nuclear power. Consequently Japan tends to be parsimonious in consuming electricity, so for heating and cooling you’ll find minisplit units, i.e. ductless heat pumps, which are very efficient. There will either be a remote control or a wall mounted control that you’ll have to set for heating, cooling, or just fan as well as the temperature you prefer and sometimes a timer. Of course it’s all in Japanese, so in order to know what you’re doing you’ll either have to read Japanese or use Google Translate to decode the text on the control. Here is a link with a detailed explanation.
Kerosene is also used for room heating in Japan. This is mainly at private homes. But if you stay at a private home such as in Shirakawa-go, you may encounter them. They put out a lot of heat but they also have that kerosene odor. Worse they can emit a huge amount of CO2 into your room.
Electrical outlets. Outlets in Japan take the same two-prong plugs as in the US (although they are 100 volt, not 120 and 50 cycle, not 60). If you are bringing devices that have a three-prong plug, you’ll want bring an adaptor. Depending on the age of the accommodation you may or may not have sufficient outlets in your room. Older ryokans may have just one wall outlet in the room so you may want to bring along an extension cord with multiple outlets just in case.
WiFi. I have yet to stay at a hotel or ryokan in Japan that did not have WiFi. Cell coverage in Japan is quite good, comparable to France’s (i.e. there are no dead zones) so you can also use your phone even in remote areas. In older hotels you will probably find an Ethernet connection (!) at the desk in your room. USB outlets? You’ll find them in newer hotels but probably not anywhere else so bring a hub if you’ve got lots of devices to charge.
Laundry. Laundry is always a chore when you’re cycle touring. If you’re doing a short trip—a few days—it might be possible to carry a fresh set of cycling clothes for each day. For a longer tour, say over a week, your limited luggage is going to dictate how much clothes you dare to bring. Keep in mind that you’ll often need to bring additional cycling clothes for rainy weather or if you expect to encounter chilly conditions. Experienced cycle tourists generally plan to wash their clothes in the bathroom sink/shower/tub when they arrive at the destination hotel/inn and hope that it dries out by the next day. A rotation of three sets of bottoms and jerseys will usually do. You’ll always have a clean set in case you can’t do your laundry one day due to lack of a private bathroom, late arrival, early dinner, or just being too tired. There are a bunch of tips for handling laundry while on tour that I won’t go into here. But briefly having a clothes hanging cord such as Rick Steve’s, carrying laundry detergent such as Woolite, and knowing how to get as much water out of your clothes so it will dry quickly are the main ones. Clothes hangers? There may be enough to hang your washed cycling clothes on but don’t count on it–hang it in the bathroom on on the little rack in your room if your lodging has an onsen.
Japan has one convenience that beats touring in Europe: washing machines and dryers are common in hotels. In our experience practically every hotel (but not ryokan) has a coin laundry room that guests are welcome to use. Many have machines that will automatically dispense detergent. This is a real boon when you’re touring because instead of having a burdensome chore to do when you arrive at the hotel when you’re tired and/or hungry or have already had that post-ride biru (beer) or two, you can just dump your clothes in the washing machine for about 200 Yen (about $1.25) and retrieve it later. It’s worth every yen for the convenience! We’ve seen top loaders and front loaders in hotels but even the top loaders seem to have a high speed spin to remove as much water as possible. This makes drying even faster. You can then hang your clothes in your room or throw it in the dryer for another 100 Yen or so to make sure it’s dry by morning. You won’t need to do too much deciphering of the Japanese text because the operation of the machines is so simple. Use Google Translate if you’re not sure if detergent will be dispensed automatically. (If you see a detergent for sale in the laundry room, that’s a clue!) For travel we bring a few detergent pods we can throw into a washing machine if we need to.
Convenience machines. Japan is the land of vending machines. There are vending machines for drinks everywhere on the street including in the middle of nowhere in the rural areas. This is also true in hotels. There is usually a vending machine area in hotels not just for juice and soft drinks but also electrolyte beverages (‘Pocari Sweat’!), hot coffee, cold coffee drinks, and green tea. Often hotels have filtered water dispensers, ice machines, hot coffee or espresso machines, and ice cream chests, and even a popular probiotic, Yakult. At hotels with onsens you may see machines dispensing beer outside the onsen. There is one other common convenience machine: a microwave oven. If you head to a nearby konbini (convenience store), you can get plenty of food items that you can heat up in the hotel microwave including soup, noodles, fried food, food bowls, etc. (Most konbini can microwave your food for you also.)
Bicycle Parking. If you’re on an organized tour, the guides will have it sorted out where you park your bike. This is the time to let the guides know—if you haven’t already—that you’re having a problem with your bike such as wonky shifting, noise, worn brakes, etc. Theft in Japan is much rarer than in the US especially bicycle theft. In general it’s usually safe to leave your bike unattended if you’re visiting a site such as a shrine, going into a store, or stopping to get a meal. That said at night I’ve noticed that our group’s bikes are cabled together if they are left in front of the hotel or ryokan in a larger city.
I’m fixing a hole where the rain gets in And stops my mind from wandering Where it will go —Lennon/McCartney
Removing the tire from the rim. How do you get a tire off? Try massaging it gently and sensually until…just kidding! Even if you haven’t found the puncture after inspecting the exterior of the tire, you can move to the next step: demounting the tire from the rim. To do this you’ll need to completely deflate the tire if it’s not already completely flat.
Presta (L) and Schrader (R) valves
Tubes have either a Presta valve or a Schrader valve. (You’ll hear about Dunlop valves but I’ve never ever seen a bicycle tire with a Dunlop valve in all my years.) Schrader valves are also used on automobile tires, so if the valve looks like your car tire valve, you have Schrader. Deflate a Schrader valve by pressing in the little tip in the center of the valve; you may be able to do this with just a finger. But if not you’ll need to use something pointy like a pencil tip, small screwdriver, or the tip of a key. If you have Presta valves, just unscrew the captive nut on top and press down until it’s completely deflated. (If you have a tubeless tire with sealant, you may depress the Presta valve and little or no air comes out despite the tire feeling rather inflated. This is likely due to dried sealant clogging the Presta valve.) Your tube may be secured to the rim by a screw-on locknut. If your tube has a locknut over the valve to secure it to the rim, remove it first.
Traditional (“hooked”) rim and Hookless rim
Tires are getting harder to remove and install. Tires are manufactured to more stringent standards now because of the introduction of so-called “hookless” rims. These rims have straight walls on the inside edge. A traditional rim has a “hook” i.e. a bulbous shape that traps the tire bead and prevents it from moving upward and off the rim. Since there is nothing physical to block the tire bead from sliding up and off the rim, making the tire bead as tight as possible is essential for preventing a blow-off. (Also important is requiring users to inflate tires to lower pressure.) Hence tire manufacturers are now producing tires to be tighter fitting on all rims even if most of us aren’t using a hookless rim. So getting a tire bead on or off a rim, hookless or not, is generally more difficult now than it was in the past.
In order to remove a tire with less struggle you should push both tire beads into the center of the rim, ie. the well. This is because each tire bead sits on a ledge on the inside of the rim and that ledge is higher than the center. By having the tire beads in the center, the well, you’ll have more slack to pull the tire bead over the edge of the rim.
Tire levers in use
Using tire irons. Tire “irons”, or levers, are the most common way to remove a tire and you will need at least two. They have a flat end that is intended to slip easily under a tire bead; the other end almost always has a hook to grab onto a spoke thus freeing your hand. There is another tool called a tire jack that you can use to remove a tire. By the way if you don’t have tire irons handy, you might be tempted to use something else to lift the tire bead off the rim such as flathead screwdrivers. My advice: don’t. Unlike tire levers screwdrivers (a) have sharp edges and (b) are invariably made of steel. Using a screwdriver is a great way to puncture your inner tube just by trying to remove (or install) a tire. Then you’ll have at least two punctures to fix! Tire levers have rounded edges and usually—but not always—are made of something softer such as plastic. Also, a metal screwdriver can damage the rim especially if it is carbon as well as the rim tape in the well of the rim.
The basic idea of a tire lever is to insert the flat end carefully under the bead and lever the bead up and over the rim edge at which point you can attach the hook end of the tire iron onto the spoke underneath to hold it in place and free up your hand. You must be careful not to pinch the inner tube with the tire lever. What do I mean by “pinch”? When you insert the tire iron under the bead, you can’t see for certain if you are also impinging part of the inner tube between the bead and the tool. The pressure of levering the bead over the rim edge is enough to break through the rubber of the tube. If you pinch it, you will very likely puncture it. I have done this with butyl, latex, and TPU inner tubes so no tube material is immune from this user error.
Rotate the wheel about two to three inches and use the second tire lever to lift another portion of the bead out. This is going to be more difficult because most or all of the slack in the tire bead is now gone due to the first tire lever. You’re going to try to lift more of the bead that is (hopefully) already slightly lifted by the first tire lever, just enough to push the second tire lever under it. Be careful not to entrain the inner tube. Take your time and don’t rush. You should now have a larger section of bead over the rim. (You don’t always need to attach the second tire lever to a spoke but if you do, you will need that third lever.) You may have to remove the second lever and repeat this one or two more times a few inches further along the bead each time until you have enough tire bead over the rim and it becomes slack. Now the bead should be able to stay out on its own. At this point you can simply slide the second tire iron along the circumference while it’s still under the bead until the entire bead is off the rim on one side. Now you can remove the inner tube. Usually you do not need to remove both beads from the rim, i.e. completely separate the tire from the rim. One side is usually enough for inspection and roadside repair.
Ideally that’s how events should unfold. However I’ve had tire-rim combinations that have been so tight I could not insert a second tire iron under the tire bead without using a great deal of force. Even if I got the lever under the bead, I could tell that an undue amount of force would be required to lift the bead off the rim. Unfortunately that’s going to become the ’new normal’ as time goes on and older rims and tires go out of circulation (pun intended). I can attest that the use of force, the result of a lot of exasperation and disbelief, is not always productive; I have jammed the second tire iron in and ended up pinching and puncturing the inner tube. You might have more success than I especially if you are more patient. Another possible outcome is that your tire lever snaps—yes, this can happen occasionally (but rarely). There is a solution though: a tire jack, which I’ll discuss in the next post.
That said, tires and inner tubes eventually age after being installed and inflated and they will stretch and loosen slightly and this tends to make removing the tire easier in the future. When a tire is new is usually the hardest.
Note the orientation of the inner tube to the wheel. After you find the puncture in the tube you’ll want to inspect the tire at the same location to see if there is something still stuck in the tire. If you unknowingly flip either of them around, then you’ll end up inspecting the mirror image location of the tire, i.e. the wrong place. If you’ve lost track and don’t know if you’ve flipped the tube or tire around, don’t worry. You’ll just have to inspect two sites instead of one.
Looking for the leak on the inner tube. With the inner tube out of the tire, pump it up enough to look for leaking air. You don’t have to pump it up a lot, just enough. If the tube doesn’t inflate at all, then you have a big puncture such as a gash or tear and you should be able to find it just by visually inspecting the tube. If the tube does inflate but deflates quickly, your puncture is likely bigger than a pinhole and you may be able to find it quickly. If you can’t see the puncture, hear it, or feel the air rushing out, you may have to be quicker or do double-duty: pump a bit and inspect sections of the tube while you pump. This is usually difficult or impossible with a mini pump if the tube deflates quickly. Another trick is to squeeze off half the tube while you pump; if the tube inflates normally, then the puncture is in the section you’ve squeezed off. Then squeeze off part of that section and try again until you narrow down the section that has a puncture.
Inner tube with snake bite punctureHow a “snake bite” puncture happens
Also pay attention to where on the inner tube the puncture is located. If you roll over something sharp like a thorn or a tack, the puncture site should be on the outer circumference of the inner tube. But punctures happen elsewhere as well. Sharp objects can also poke through from the side. So if you notice the puncture is on one of the side of the inner tube, you will want to check the sidewall area of the tire. Although something sharp can poke in your tire from the side, the most common cause is hitting a pothole or rock so hard that the tire compresses fully and pinches the inner tube against the rim; this causes a ‘snake bite’ puncture, which is two small gashes together where the rim has cut the inner tube and these are off-center. If you hit hard enough you can get a snake bike puncture on both sides of the tire too (but this is rare).
Exposed spoke holes can cause flats
You can also get a puncture on the underside of the tube. Most rims have spoke holes that go completely through the rim. This is so a spoke nipple can be inserted to thread onto the spoke to tension it. Those holes are covered by rim tape so that when the inner tube is inflated, it doesn’t expand into the interior of the rim (if it has an interior chamber). It covers the spoke hole to prevent the edges of the hole from cutting the tube. Most spokes protrude above the nipple and are sharp. If the tube enters the spoke hole, the spoke itself can also puncture the tube.
Rim tape itself can rub and abrade a tube on the underside especially if it isn’t laid down completely flat and even. Most rims have spoke holes and these must be covered with rim tape or sealant tape if you’re using sealant. Rim tape can slowly move and expose a spoke hole simply from the pressure of the inflated tube pushing on it. (This is why when the rim tape is replaced it is important to make sure it is centered over each spoke hole and the tape–if it has adhesive–most do but not all–that it is firmly pushed into the rim well to get it to stick and not move. Rim tape especially those made of plastic can also age and tear. Then the tube can be punctured by the edge of the spoke hole or if the tape moves sufficiently or tears, then the tube will be forced into the rim by air pressure and may fail.
Another thing that might confuse where the location of the puncture is on the tire: if your inner tube was twisted when it was inserted in your tire. Usually a tube will untwist as you inflate it. But sometimes it doesn’t completely untwist. If it is slightly twisted, then the location of the puncture on the tube will not match up exactly with the real location on the tire. For example a puncture that appears on the side of the tube might actually be on the tread side of the tire. Of course when you install an inner tube you should be careful to insert it so it’s not twisted in any way. (Easier said than done sometimes.) So when you are inspecting the tire for a sharp object, make sure to check the area around the suspected puncture site.
If you still haven’t been able to find a puncture, it might be due to an old puncture, i.e. it was patched before but now the patch is failing. So check any old patch sites on the inner tube to make sure they are not leaking air.
After you’ve found the puncture site, you don’t need to repair it until you get home. You’ve gone through this procedure in order to be able to find the puncture location on the tire so that you can make sure the culprit is completely removed. Note the puncture site and then hold the tube against your tire with the tube oriented the same way as when you removed it. Now you should be able to find the area on the tire that was punctured. Remember, if you’re not sure of the orientation, then you’ll need to flip the tube around and note the mirror image location on the tire. Inspect that spot as well.
Thorn protruding inside a tire
Removing the sharp object from the tire. Inspecting the tire involves looking and feeling for something remaining in the tire that pokes through the tire. The outside might look fine only because the thorn/wire/glass shard has been pressed completely into the tire rubber and is inconspicuous. But on the inside something sharp remains to puncture another tube. So look and palpate the inside near the suspected puncture site. Do your inspection carefully because overlooking something may cause you to puncture your spare tube. If you find an offending object, remove it.
But how do you remove it? If it’s large enough, you can use your fingers. If not, you might be able to use a pen knife or a flat screwdriver (on your multitool) to dig it out. If you’re fortunate to have tweezers (Swiss Army knife), try them.
One more thing: although unlikely there is a chance you have more than one sharp object embedded in your tire. This can happen when you roll through scattered broken glass or an area that has a lot of blackberry bushes adjacent to the road. Another cause is a patch of goathead thorns (puncture vine). So just because you’ve found one puncture in your tube doesn’t preclude that there might be another. So double-check.
After all that explanation, here’s online video that covers much the same ground adequately albeit briefly:
One thing of note: although the presenter completely removes the tire and tube from the wheel, this is not essential especially when you’re standing by the side of the road or trail rather than in a workshop.
3 Saturday. Tierra Bella Century. 100-, 77-, 55-, and 33-mile routes. 100-, 74-, 49-, and 29-mile routes. $95-$85. Big changes this year for the Tierra Bella. Event start has moved from Gavilan College to Christmas Hill Park in Gilroy. More importantly you have to be a member of ACTC in order to ride. But they’re throwing in a “trial” membership good until May 31 along with your registration. The overall rider limit is 1,000, a drop from 1,200 last year. The 100-mile route is limited to 200 registrants; 74-mile to 300 registrants, and the 49-mile to 200. Registration is open. 3 Saturday. SLO Wildflower. 80-, 65-, 50- and 35-mile routes. $120. Limit of 1,000. The 80-mile route is still offered with hope of catching wildflowers. In 2022 the club went down to do this ride and had a great time. Registration is open. now closed. No day-of-event registration. 3 Saturday. Delta Century. 100-, 67-, and 26-mile routes. $75-$50. Very flat rides starting in Woodbridge tour the Sacramento Delta. Registration is open. 3 Saturday. Wine Country Century. 103-, 63- and 31-mile routes. $140-$110. A club fave and great food. It always sells out so register early. Limited to 2,500. Registration is open. 4 Sunday. Grizzly Peak Century. 100-, 75-, 50-, and 30-mile routes. And a 100- or 65-km gravel routes. $100-$70. Limit of 1,000 riders. Registration is open. 17 Saturday. Davis Double. 200 miles, period. $160-$140. The $140 is for Davis Bike Club members only; $160 includes a trial membership for non-DBC people. Limited to 500 riders. Registration is open. 17-18 Saturday & Sunday. Siskiyou Scenic Bicycle Tour. 104-, 67-, 40-, and 21-mile road routes on Saturday; 63-, 59-, and 39-mile gravel routes on Sunday plus a 35-mile road on Sunday too. $92-$39. Riding in the beautiful area around Yreka. Registration is open. 18 Sunday. Strawberry Fields Forever. 102-, 64-, and 30-mile routes; 40- and 20-mile gravel routes too. $115-$90. Out of Watsonville and into the Santa Cruz Mountains. Also, a gravel ride is being offered for the first time. Registration is open. 24-25 Saturday-Sunday. The Art of Survival Century. 100-, 60-, 38-mile road routes & 74-, 54-mile gravel routes. $80-$60. Rides near the Oregon border in NW California remembering the Tule Lake internment of Japanese-Americans in WWII. Road rides on Saturday; gravel rides on Sunday. Registration is open. 31 Saturday. Ojai Valley Century. 101-, 75-, 63-, and 31-mile routes? $187-$181. A bit further south in Ventura County in the Ojai Valley out to Santa Barbara and back. Information on the website is slightly confusing (not helped by the seemingly complete lack of editing and terrible spelling), likely due to hasty revisions to last year’s info. High cost is probably partly due to RFID tags being issued to all participants even though this isn’t a race. Registration is open.
JUNE
No Sierra To The Sea for 2025. ACTC has decided to stop offering its annual June Sierra to the Sea tour because of riding costs. Will we ever see this ride again?
1 Sunday. Sequoia Century. 100-, 75-, and 62-, and 38-mile routes. $135-$105. A venerable century going from the Midpeninsula over the Coast Range to coastside and back. The routes change every year. Registration is open. 6-8 Sunday to Tuesday. Cycle Oregon (Gravel). $598. Limit of 600. This is a gravel weekend on the Trask River in Tillamook County. Selection of rides. Camping on the Oregon coast along with fly fishing, live music, food, etc. Registration is open. has closed. 7 Saturday. Gold Country Challenge. 100-, 74-, 54-, and 35-mile road routes; also 18-, 42-, and 62-mile mixed terrain routes. $100-$65. Rides through the Gold Country around Grass Valley and Nevada City. Registration is open. 14 Saturday. Mile High 100. 100-, 68- and 33-mile routes. $102-$86. Rides around Lake Almanor near Chester, CA and Lassen. Registration is open. This event is postponed to 2026 due to road construction issues. 21 Saturday. Climb to Kaiser. $?. 155- and 99-mile routes. The hardest climb in California: 15,000 vertical gain. Registration is not yet open. 21 Saturday. Terrible Two Double Century. 200-, 121-, and 112- mile route. $170-$120. No information yet. Registration will open in March. is now open. Alta Alpina Challenge. Will not be offered in 2025.
JULY
12 Saturday. Death Ride. $244. 103 miles. Monitor, Ebbetts, and Pacific Grade summit for 14,000 vertical gain. This used to be a club ‘thing’. But now it’s just passé. And the fee? Jumping the shark. Registration is open. 12 Saturday. Giro Bello. 101 mile, 100k, and 50k routes. $134-$107. Similar to the Wine Country Century and in the same area. New routes this year because of road work. Registration is open. 18-20 Friday to Sunday. Cycle Oregon Joyride. $546. 52- to 12-mile routes. Multiple routes each day. Camping in Tygh Valley, Oregon. Women and nonbinary only. Limited to 400. Registration is open. 26? Saturday. Santa Cruz Mountains Challenge. $100-$75? 125-, 100-, 75-, 50- or 36-mile routes? No word yet on a 2025 offering of this venerable ride. Was on hiatus in 2024, so this is ominous.
Our destination is destined to be a bike shop for help.
Five of us, David M., Ginny, Chris, Scott and James, showed up at Peet’s on Market for a quick whirl around the western part of the City. Our warmup through Duboce Triangle and the Haight led some riders to try a quick HIIT interval up Fell street to the entrance of the park. We regrouped and lowered our heart rates for a casual descent through the park to Queen Wilhelmina’s Garden and Windmill. Photo’s were taken. On the way south on the Great Highway (closed to traffic for the weekend), another HIIT broke out, lasting until the regroup at Sloat. Common sense prevailed after that as we made our way anti-clockwise around Lake Merced and up Sloat until 19th Avenue, where apparently the cycling gods became angry and smote the rear tire of Chris’s bicycle. The tube-change-by-committee effort failed. The group decided to divide and conquer with Ginny, Scott and James heading on while David and Chris dropped in on the Stonestown Sports Basement to get the rear tube and tire the healing we couldn’t provide in the field. All tires whole and pressurized, David and Chris proceeded to route, making short work of the climb through St. Francis Wood and the Westwood Highlands before cruising down Monterey to Glen Park and Destination Bakery, where we rested a few minutes before heading on the final lap through the Mission and back to the Castro. Unfortunately the cycling gods were not appeased by the sacrifice of a mere rear tube and $20 at the altar of the bike shop. Near San Jose and 29th Street they smote Chris’s front tire at which point he decided to call it a day and take the bus back downtown. David had an easy roll back to the Castro. –David Millard
Joe McClinton, a former Spoker who is fluent in Italian and who has led bike tours in Italy, told me before I went to Italy to cycle for the first time in 2000, “So-called Italian food here is very different from what you’ll be eating in Italy.” At the time I didn’t understand what he said but it turned out he was right—what we get here is really Italian-American food, i.e. something derived from southern Italy that has been modified because immigrants couldn’t get the same ingredients here then modified again in restaurants for the American palate. The same goes for Japanese food: what we get here is just a subset of what you’ll get there and it’s different anyway. The number of food items and dishes we’ve eaten there that I’ve never ever encountered in the Bay Area is very high. Yes, you can get sushi and sashimi here and nowadays you can even get fresh ramen, which has recently become popular. But the variety of fish from which they are derived is much more diverse. Speaking of which, if you don’t like seafood you may have a difficult time eating in Japan. Seafood whether it be the myriad types of fish, crustaceans, or mollusks is found everywhere and various kinds of seaweed are eaten all the time. In fact dashi, the broth used throughout Japanese cooking is made from bonito tuna and seaweed. Common kinds of seafood eaten regularly in Japan include sea snails, octopus, and eel, which we rarely see here even in Japanese restaurants.
This isn’t to say that meat is uncommon—it’s not. Wagyu and Kobe beef are famous and everybody loves fried chicken, karaage. KFC has had great success in Japan because fried chicken is so loved. At Christmas time—yes, the Japanese celebrate Christmas even though they’re not Christians—people line up to order their bucket of KFC and Christmas cake, which often runs out if you don’t reserve in advance. But the proportion of food that is ocean derived is very high compared to the US.
If you’re vegan or vegetarian, be prepared to have a more difficult time in Japan. Buddhist cuisine, which is vegan (mostly), can be found at the temples but there are very few restaurants in that niche and they’re usually in the big cities. Animal derived food products are ubiquitous from dashi, which is made from bonito tuna, to sauces made from fermented fish., and ramen soup broth made from pork bones. Although tofu is readily available, you may not find that in some restaurants. And much of the time it’s opaque exactly what ingredients were used in a dish. Another complication is that where Japanese Buddhists draw the line is different from vegans: many Buddhists consume dairy since they believe that no killing is involved in obtaining milk and animals produce milk to feed their young. If you strictly vegan, then you will need to look for places that serve shojin ryori, or Buddhist cuisine, which is mainly at temples.
If you’re avoiding gluten, Japan is a really tough place. Although the prevalent grain products are rice and buckwheat, there are many common foods that contain gluten such as soy sauce and miso. Food package information is in Japanese and deciphering it for gluten is sometimes completely opaque.
When it comes to eating out in restaurants, you’ll often find that restaurants offer just one ‘type’ of food—ramen restaurants serve just ramen (but sometimes soba or udon too); sushi restaurants serve just sushi. When you’re out in the countryside you may have no idea what a place is serving unless they have pictures or it’s obvious when you look at the kitchen or what other patrons are eating. If they have a menu, you can use Google Translate to decipher the text.
Low table requiring sitting crosslegged or seiza style: not for the inflexible
On Cycling Japan tours most of the dinners are included, usually at the hotel or ryokan. But sometimes we are taken out to a restaurant and even on free nights we would occasionally go with the guides to a recommended venue. Their choice in eating establishments is always excellent, places that we would never find by ourselves. In traditonal restaurants it’s not uncommon to be seated at a low table rather than a standard height table and the flooring is often tatami so you’ll have to remove your shoes when you enter the restaurant. You will need to be flexible too in order to sit seiza or crosslegged on a cushion. Sometimes you can get a low chair or stool to sit if you’re not flexible enough to sit on the floor but depending on the number of westerners—and it’s always westerners who request the chairs!—there may not be one available.
Low table but inset for legs for “normal” posture
Some places you may be seated at a low table but there is a hollow space underneath for you to put your legs and sit in a normal position. Then you only need to be flexible enough to get your legs under the table and later out from under. At hotels this isn’t an issue because they always have standard height tables and chairs for everyone.
What’s for breakfast?
Traditional breakfasts in Japan are quite different than here. Expect to get fish of some kind, white rice, and miso soup. In many hotels you’ll see a mixture of traditional and western foods although they may not be exactly what you eat at home. For example there is a traditional egg omelot (tamagoyaki) but it’s made with sugar and dashi in a square pan and folded into a roll; there are no fillings. You may see what look to be hard boiled eggs in a bowl; they’re not—they’re uncooked. Breaking a raw egg and putting it on a bowl of rice is common. (Eggs in Japan undergo inspection and cleaning to reduce the chance of salmonella contamination.)
Common breakfast food: natto over white rice
A traditional breakfast food is natto, fermented soy beans that have a very gooey texture served on rice; it’s definitely an acquired taste! Don’t expect toast, bacon or sausages, or pancakes. Cereal is rare except for cooked rice. Yogurt is sometimes available but don’t count on it. Hotels generally serve some western breakfast foods e.g. scrambled eggs and may have bread or rolls. A change we’ve noticed over the years is that coffee is more available; at ryokans it’s usually green tea for a hot drink. In hotels it’s not uncommon to have a green salad available at breakfast. It’s rare to have salad at dinner. For me that’s great because I love salad at any time of the day! I’ve been surprised at the paucity of vegetables served at any meal. Vegetables are served but they are in small quantities. One change in Japan is that coffee has become increasingly popular and available although this is rarer at ryokans than at hotels.
If you have difficulty stomaching a Japanese breakfast—fish or natto first thing in the morning can be a bit much—you can plan either to buy something ahead of time at a konbini or else pack something from home to eat instead. Of course you don’t do that at the table where you’re being served as that would be rude. Roger brings instant oatmeal that he makes in the room with the electric teapot or hot water.
There are always some vegetables but the quantity is quite small compared to what I’m used to eating. Like the American diet in Japan people prefer carbs (rice or noodles) and protein (seafood or meat) with vegetables mainly being window dressing. This can be quite different from a traditional rural meal, which is vegetable rich. But modern life has come to Japan too.
Whole grain products are rare, or at least I’ve never seen them. All rice except at perhaps some western oriented restaurants in Tokyo is white. Although bread was originally brought to Japan from the West, it’s found everywhere in Japan. But finding whole wheat bread is difficult.
Desserts and sweets are ubiquitous but apparently the Japanese palate is different as they are almost always less sweet than they are here. But I think that’s a good thing because the higher level of sweetness overwhelms the flavors of the dessert, which are often delicate. Although you may not be served ice cream at a restaurant or ryokan, it’s found everywhere in Japan especially soft-serve ice cream and a variety of Magnum-type ice cream bars at convenience stores and markets.
7-11, Ministop, Family Mart: some konbini
Speaking of convenience stores, called konbini in Japan, it’s on a completely different level. First, they’re everywhere and lots of them. If you’ve been to Hawaii you’ve noticed that there are ABC stores on practically every other block. That’s what it’s like in towns in Japan. There is fierce competition between stores. You’ll see 7-11, Family Mart, Lawson, Circle K, Yamazaki, and Ministop. Second, these small stores are stocked with items we could only dream of here; they have a little of everything from household cleaning products, clothing(!), toiletries, stationary as well as a huge variety of foods. They’re like mini-Targets. Konbini like convenience stores here stock a variety of beverages and snacks. But in Japan they always sell hot food—croquettes, fried chicken, skewered meat—as well as an enormous variety of packaged sandwiches, salads, pastries, onigiri(rice balls), sushi, and a shit ton of Japanese prepared foods you never see over here. They also have a variety of plates or bowls of food that just need to be warmed up for a meal such as noodles, rice bowls, soups, gyoza. You can put together a full meal there! If you’re wanting a quick meal and don’t want to go into a restaurant, these stores are the solution. Occasionally you’ll find fresh fruit but fruit is mostly precut in sealed plastic cups. At checkout you’ll always get asked (a) do you need a bag (10 Yen additional cost)? and/or (b) do you want that heated (if you’ve bought something microwavable)? They usually throw in hashi (chopsticks) or a spoon if they see you’re buying something that needs one or the other. Some konbini cashiers do not handle your cash and instead your total payment due is displayed on a screen and you feed your cash payment into the machine. Then it dispenses any difference you’re owed. You’re always given a paper receipt on checking out.
Until the ill-fated 2020 Olympics in Japan the only places you could get Japanese cash was either the post office or…7-11! Japan is still primarily a cash-based culture and credit card use is much lower than here. Consequently many businesses do not accept credit or debit cards and you must pay in cash. This is especially true outside of big cities. Since 7-11 like most konbini was open at most hours, it is the most convenient place to go to get money. With the Olympics Japan expected an influx of foreign visitors who would need cash and the government liberalized the use of ATMs allowing currency exchange. Now other konbini chains have ATM machines and you’ll be able to get cash more easily. In order to use your card you’ll need to have set up your debit card with a PIN if you haven’t already (and notified your bank that you’re going to Japan.) If you’re at a restaurant or konbini, be sure you have sufficient cash. By the way, there is no tipping in restaurants. If you leave change on your table, you’re likely to find the staff chasing after you to give it back.
Although public toilets in Japan are more common than here, konbini are also places that offer public toilets.
Foreign food. As you know Japan has an incredibly deep and sophisticated food culture and it has benefited from contact with other cultures. Noodles almost certainly came from China originally just as was the case in Europe. Some foods from elsewhere somehow strike a chord in Japan and they become adopted and often transformed. A oft-cited and to us strange example is spaghetti napolitano. This so-called Italian dish is actually from contact with the US post-WW2. This dish is noodles with a ‘tomato’ sauce made from ketchup. Like the British, Japanese seem to prefer their bread without any crust, so you’ll get sandwiches with the crust completely removed. Speaking of bread, the most common form is milk bread, which resembles Wonder Bread but is tastier. Another interesting transformation is Mont Blanc. Originally from Italy/France this is a delicious chestnut puree served with whipped cream, sometimes made into a meringue. But somehow in Japan this dish now called monburan has been transformed into a cake with chestnut puree or cream. (It’s also very delicious!) Another foreign food that has been completely absorbed into Japanese cuisine is curry. Kare Raisu–curry rice, i.e. white rice with beef, deep fried pork cutlet, chicken, or just vegetables and Japanese curry sauce is ubiquitous. Although the sauce is definitely curry derived, being similar to Madras curry, it’s not what you would get at any Indian/Pakistani restaurant here.
Times for breakfast, lunch, and dinner are similar to the US. On Cycling Japan tours lunches are not included in the tour package but we almost inevitably eat together at a specific spot that the guides have picked out. There are probably several reasons for this and I’ll go into detail in a subsequent post. Lunch usually runs between 500 to 2000 Yen.
A kaiseki dinner example
Dinners at hotels and ryokans. These are almost always kaiseki dinners (at large hotel/resorts you may have a gigantic buffet). Kaiseki is the Japanese equivalent of formal dining and involves multiple courses anywhere from about 7 or 8 up to about15. Most of the dishes are small, usually a bite or two. Depending on the number most of them will be set at the table when you arrive. Larger kaiseki involves subsequent dishes being brought to the table. Often there is a Sterno cooker or two at your setting where you will heat or cook some of your food yourself. Typically there is sashimi, tempura, a savory egg custard with seafood, Japanese pickled vegetables, soup usually miso, various seafood dishes, various vegetable or seaweed dishes. Rice is often served last unless you ask for it during the meal. Kaiseki meals have amazing variety and no two seem to be the same. Since each dish is on the small side, if there is something you really like, well, that’s all you’re getting for the meal. (There aren’t any seconds except for rice.)
Presentation is paramount in kaiseki so be sure to look at your food before you gobble it down. Although much of the food you’ll be able to figure out, there may be dishes whose ingredient(s) is unfamiliar. The food is inevitably very fresh; seasonality is important in Japanese cuisine so don’t expect to get corn in December. These meals are not dash and dine affairs; expect to linger over dinner.
Alcohol is always available at dinner time usually beer or sake; in Kyushu you may have shochu as well. Shochu is a fortified sake. Sake is like wine in that it’s very local so the sake you may get in one region is completely different than what you’d get elsewhere. This doesn’t seem to be the case with beer, which is always one of the big brands e.g. Kirin, Asahi. Craft beers can be found in the big cities but seem to be absent in the countryside. By the way, drunk driving is taken seriously in Japan. If your BAC is 0.05% or higher, you’re impaired enough to be arrested. That applies to cycling too so alcohol at lunch time is forbidden on tours.