Our tour was not self-supported by any means. (For more information about self-supported touring in Japan, speak to David Shiver or Phil Bokovoy.) There are several companies in Japan that provide supported cycling tours. These are usually van supported tour so one’s luggage is hauled from stop to stop and varying degrees of on-road support are offered. We’re lazy so we have opted for package tours that have specific itineraries, van support, and all hotel/inn bookings handled by the tour company. In addition the company we have used, Cycling Japan, which by the way is Japanese owned and run, can provide rental bikes both regular or e-bikes (along with spare batteries if you burn through one during the day). They provide road bikes, hybrids, or touring bikes depending on your preference and they set them up according to your measurements.
Whether to bring your own bike or rent one. Taking your personal bike overseas is an undertaking unto itself. If you take your own bike, you will have to haul it in addition to your other luggage. Airlines have gone back and forth on whether to charge for bikes as oversize luggage; check airlines for the latest policy. If you plan to do any additional traveling while you are overseas after your tour, you will either have to find a way to stash your bike such as left luggage or you’ll end up hauling it with you even though you don’t need it. Sometimes it is possible to ship your bike to your start destination. If so, you need assurance that it will not only arrive intact but on time. (The same goes for flying with your bike. Airlines lose bikes occasionally and yours may not arrive on time.) If you want to use your e-bike, you will not be allowed to pack the lithium battery packs in your stowed luggage—it’s illegal. You will then have to take it with you into the cabin and there are limitations on the battery size and the number of batteries that can be brought onboard.
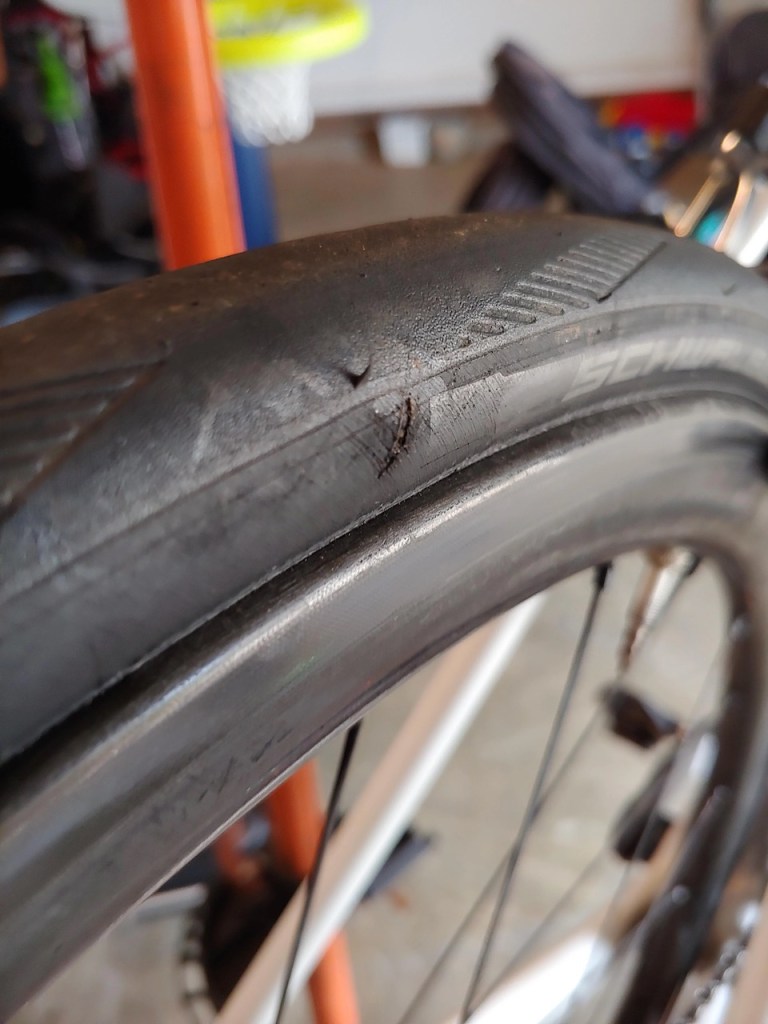
Renting a bike means you’ll shed the burden of packing, hauling, and unpacking your bike. But you may get a rental bike that is not to your satisfaction. When you take your own bike, you have a bike you’re familiar with and set up just as you want. Since Roger uses e-bikes exclusively, he has to rent one. Before going to Japan I had never rented a bike and had always brought my own touring bike that is kitted out the way I prefer. The first time we went to Japan with Cycling Japan I decided to try a rental because it would make the travel logistics so much easier not to lug a bike around. I’ve been fairly satisfied with their bikes even if they are more modest—but not always!—than what I would ride at home. Cycling Japan does a good job of fitting the bikes after you arrive. The other major positive is that since we are renting the bikes from the tour company, they assume the responsibility for maintaining the bikes while on tour whether that be providing fully charged battery packs, repairing flats (!), or fixing something major. On our first tour in 2016 my rental bike bottom bracket failed just before lunch one day; Kenichi swapped it out for a new one during lunch. Yes, they carry spares of everything including a fully functional road bike just in case someone’s needs repair that can’t be done immediately! Another time my freehub died just as we arrived at a ferry port. While waiting, Dai tried to fix it but couldn’t. (The pawls turned out to be shot.) So he just swapped in a spare rear wheel. If these incidents had happened with my own touring bike, I would have had to hunt for a bike shop to do the repairs. (Do not delude yourself thinking that nothing wrong can happen with your own, carefully maintained bike. We’ve seen broken derailleurs, shot shifters, broken saddles, broken seatposts, you name it, on other people’s “carefully maintained” bicycles.) If you do bring your own bike, at least have it tuned up or checked over by a pro (= not you) before you pack it.
The fitting adjustments are done on the first day of the tour, which is a non-riding day. I’ve learned over subsequent trips exactly what else I need to bring to Japan to make my rental bike work better. You are encouraged to bring your own saddle and pedals since those are highly personal contact points on the bike. Cycling Japan’s bikes have front and rear lights. But I bring more powerful lights because of the tunnels as well as a bell to use when I’m dealing with traffic. Although they provide a large rear saddle bag, I also bring a handlebar bag to carry my camera, snack food, supplies, as well as an additional place to stow clothing. By the way, in Japan brakes are set up English style, i.e. the left hand brake lever controls the rear brake and the right hand lever controls the front brake. This is the reverse of what we’re used to.
An advantage of a package tour is you’re relieved of making a lot of decisions such as where to stay, where to eat, and how far to ride or which road to take and all the associated research involved in making those decisions. Although you may not know the nittygritty details in advance, you do know the general architecture of each day and have an idea of how easy or challenging the route will be as well as the sights you might see along the way. The disadvantage is that you’re also limited to a set route and spontaneity is severely reduced. If you want to go somewhere else on a day, you’d better be able to figure out a route to your hotel/ryokan for the night! On the other hand you’re availing yourself of the company’s expertise and experience in crafting a rewarding experience. Never underestimate the value of locals’ knowledge. Another disadvantage is that because we are traveling with predominantly English speakers, we tend to cluster together rather than being forced by circumstance to interact with Japanese people. The few opportunities we have been afforded to speak directly with locals have been because they spoke some English; those interactions we cherish. Of course if you speak and understand some Japanese you’ll be able to interact more freely and likely have a much more rewarding experience while on tour. Another disadvantage of a set tour is that you’re on a schedule so even if you’d like to linger longer at a particular town you can’t. Certainly for a first-time visit to an area of Japan a tour is a great introduction and you can in the future plan to go back to explore in more depth the areas that caught your fancy.
A package cycle tour is not like riding at home. At home you can take a day off when you like or skip a day because it’s raining or unpleasantly hot. On most package tours that are point-to-point the best you’re going to be able do is maybe ride in the van. But that may not always be possible. You wake up every morning knowing you’re going to be riding regardless of the weather or how tired you feel. Unlike Northern California most of Japan can be rainy at almost any time of the year. Every tour we’ve done there has had some rain, sometimes very light all the way to torrential, all-day maelstroms. So you’re likely to be riding in the rain at some point whether you like it or not. Regarding weather summer in all but Hokkaido can be insufferably hot and humid. But even Hokkaido is getting hotter in summer due to climate change. The best times to visit Japan to cycle are spring and autumn although winters from Kyushu south to Okinawa are milder than on the northerly islands of Honshu, Shikoku, and Hokkaido and comfortable for touring.
Roads. Roads in Japan are generally in better shape than in the Bay Area. Road maintenance is serious business in Japan. Earthquakes and monsoonal storms do tremendous damage to roads whether it be by landslides, collapses, or overflowing rivers wiping them out. So there always seems to be road maintenance going on. Even in the rural areas road failures seem to be addressed quickly. Whereas county road budgets here always seem to be impoverished, Japanese fund maintenance to the extent that even potholes are rare.

Vehicles use the left side of the roadway as they do in the UK, Australia, and New Zealand so you’ll be cycling on the left side as well, i.e. close to the left edge of the roadway. This can be initially disorienting for Americans and one can forget which lane to use when turning at intersections—turn left and stay to the left, turn right and also stay to the left! If you use a cycling mirror, you’ll need to switch it to the other side of your helmet/eyeglasses/handlebar in order to see the traffic behind you. Traffic laws as well as general expectations of cycling behavior are slightly different in Japan. For example there is no right/left turn on red: all vehicular traffic waits until there is a green light before turning. Cyclists turning right are expected to make ’square’ turns: wait for the green light, proceed through the intersection to the corner, then wait for the green light before going to the right.


No surprise: road signage is different in Japan. The main difference is the stop sign; in Japan it’s a red triangle rather than an octagon. But occasionally you’ll see “STOP” on the road surface. Informational signs are mainly in Japanese but city names are usually also in Roman characters. Most other signs are standard. You will also see a sign allowing bicycles to ride on sidewalks as well at not allowing bicycles. But the latter are often ignored as long as you’re respectful of pedestrians.
Because Japan has a very long history its roads are similar to what you’ll find in Europe: an extremely fine and dense network of tertiary roads. These roads are used mainly by locals and local delivery trucks and businesses; people traveling point to point and larger delivery trucks instead stick to the main roads. It is not uncommon to be on a road so isolated and narrow that two cars can barely pass each other—and these are small, narrow Japanese cars! It almost goes without saying that these roads are lovely to ride on. Of course to get to these tertiary roads you inevitably have to take the major roads and many coastline roads are pretty heavily trafficked especially near the bigger cities. Roads in Japan are often narrower than what our Highway Code would require. Lanes are usually narrower and the presence of a reasonable shoulder is hit-and-miss. Bikes are expected to ride on the left edge of the lane if there is no shoulder; the idea of “taking the lane” is indeed foreign in Japan—drivers do not expect you to be in the middle of the lane. That said we’ve had exactly one incident in the thousands of miles we’ve ridden there when a driver seemed so uptight about being behind a line of cyclists that he sped up furiously to pass us even when it was patently unsafe to do so; in other words he did what would be have been matter-of-fact here!

Tunnels. If you ride in Japan you’re going to be going through tunnels. Along the coast tunnels are cut through bluffs over which no road could be constructed. Given that we’ve cycled on 15%+ grades on coast roads—similar to the rolling hills on the San Mateo coast—that’s saying something. Their benchmark for when it’s too-steep-better-dig-a-tunnel seems a lot higher than here. Tunnels vary in Japan from short galleria like you’d find in the Alps to long and dark with dismal or no lighting. Tunnels are the “short cut” so expect to encounter trucks. No matter how much I tell myself that Japanese drivers are better and more considerate than US drivers I still am unnerved when I hear the roar of a diesel engine behind me in a tunnel. So I’ve made sure to use powerful lights to be seen as well as to see the pavement and warn oncoming traffic of my presence.
Driver behavior. Driving behavior in Japan is unlike anything we have encountered in Europe and certainly here at home: drivers actually observe the speed limit. And the speed limits in Japan are lower than they are here. Typically the speed limit is 60 KPH on arterials and 40 or 30 KPH on ‘residential’ roads. Drivers also are much more patient waiting behind cyclists before making a pass. Turning at red lights is illegal and cars observe this law making it much safer for pedestrians and cyclists. When passing automobile drivers seem to have a good sense of the ‘edges’ of their car and pass with a sufficient gap. Cars and trucks are overall smaller than in the US and even Europe and they’re going more slowly than we are used to.

How do locals cycle? Riding a bike on the sidewalk is very common in cities. That said those cyclists are usually running errands and going very slowly (less than 10 MPH). Cyclists occasionally do ‘salmon’ although to a lesser extent than here. We only occasionally have seen Japanese recreational cyclists and that’s usually on a Saturday or Sunday when they have time for a ride. Do Japanese cyclists obey the letter of the law? Nope. They’ll turn at a red light as long as it’s clear. They also cycle ‘salmon’ in cities. But in general they are respectful of car drivers and don’t engage in provocative behavior; in return drivers don’t mete out punishment passes and attempt to terrorize cyclists.