The club has had at least two rides on April Fools Day, one in 1984 and another in 2012 and coincidentally they were the “same” ride–the Apple Blossom. Former club president and ChainLetter editor, Michael John, was the creator of the Sonoma Blossom ride, which then became known as the Apple Blossom and he led the first edition on this day in 1984. For the club’s 30th anniversary Roger and I led a later iteration of the Apple Blossom. That it also took place on April 1 is mere coincidence; at least I didn’t notice it until now!
The early days of the club had a prolific number of rides around the Bay Area. It was probably partly due to the club’s orientation towards biketouring that had members very willing to go beyond the San Francisco enclave and Marin. Whatever the reason it didn’t take much for a group of Spokers to get interested in a ride that involved a car drive even for what would be considered a short–20 to 30 miles–ride by today’s standards. (There are members who scoff at the idea of going to a ride that involves driving more miles than the ride has.) I think also Michael John just happened to have a rather broad knowledge of riding around the Bay Area and knew where the good and interesting stuff was. It probably all seemed like “new territory” to many members while to us it’s merely old hat.
The 1984 ride had nine participants. That’s Bob Krumm on the left, one of the founders and our first president; next to him is his boyfriend, Luis Dufau; then Scott O’Hara, then our resident porn star; Tom Crites; Jerry Basso, who died of AIDS about two years later, Jamie Moran; Richard Palmer; and finally Derek Liecty. (Michael John is not pictured because he’s taking the photo.) Luis and Jerry were unusual at the time because they were among the few who rode racing bikes and wore racing kit. As you can see most of the rest–and this was typical of rides back then–wore street clothes–gym shorts, Bermuda shorts, white athletic socks, sneakers, and in Tom Crites’s case, Levis! Luis convinced Bob to start wearing “real” cycling kit, which in those days meant wool jerseys and shorts! In the top picture you can see the kind of bikes a lot of members rode back then; they had ‘cheater’ brakes, kickstands, Pletscher racks, reflectors, and not a bit of Campy gear in sight. I do recall Jerry Basso, being Italian-American, had a celeste Bianchi road bike, which was quite unusual at the time. Also notice that no one is wearing a helmet except Richard Palmer. Helmets weren’t required on club rides until the early ’90s.
Fast forward to April 1, 2012: things have changed a bit–everyone is now wearing cycling kit and those bikes aren’t your $150 basic college bike! And everyone has a helmet.
The 2012 Apple Blossom had a good turnout as well. That’s Karry in the very front, a very early member who lapsed after getting “married”, moved to the suburbs, and had kids. He suddenly returned to do the Apple Blossom, a ride he used to lead! You can make out me, Roger S, David Go. and Roger among the rest. This ride also went to Occidental for lunch at the Union Hotel where we encountered the Occidental April Fools Day parade.
They say hippies never die–they just move to Occidental!
Green, green, it’s green they say on the far side of the hill
We’ve been trying to take advantage of good weather to get out into the East Bay hills before they start to dry up and turn brown. We have not been having a wet winter despite what you may think—our rain gauge tells us we are unlikely to reach season normal this year unless we get a couple more atmospheric rivers. That’s unlikely. Despite the overall lack of rain we have been getting enough to keep the grass hills green; in dry years they would already be turning a dun color. But the signs are there that the green hills are not going to continue much longer as we discovered yesterday in our jaunt up Patterson and Altamont Passes. Those hills are still quite green despite cattle grazing them down to near nubs. But ominous brown patches are showing up indicating that certain areas are losing what precious moisture the topsoil has.
Nonetheless we had a great time. Whatever Spokers were doing yesterday it wasn’t riding with the club—Jeff’s ride to Gazos Creek had no sign-ups and just David Go. came on our ride. David is continuing his return from a year-long injury and doing rides much harder than I would venture after such a prolonged layoff. Yesterday’s ride was 37 miles and about 2,700 feet of elevation gain. However the ascent up Patterson has several stretches well above 10% making you reach for your bigger cogs. He may not have rocketed up the passes but he rode smart—spinning low gears and going steady—and did the whole thing without complaint nor feeling gassed. After coming back from Japan last November I came down with some RSV-like cough that just wouldn’t end that kept me off the bike for about six weeks. When I started to ride in January a 25-mile, flat ride just about killed me and here was David slogging up passes I wouldn’t have gone near two months ago.
Originally we were going to do this ride on Sunday but the weather forecast had turned bad, making Saturday the only chance for a weekend ride. We ended up with a mostly sunny day with just a light westerly wind in the afternoon after a cold start in Livermore.
Speaking of Livermore, doing rides from the Livermore Valley is a trend of recent origin. Back in the day most members were in or near San Francisco. However we had one active member, Kevin Anderson aka “Rex Flash, mountain biker” aka “Flo Velcro, advice columnist”, who lived out in Pleasanton and he liked to show timid Spokers from SF what life was like in east Contra Costa! He had a popular ride out to the Shadow Cliffs Regional Recreation Area just west of Livermore to enjoy the water slide. Given the ride started in Livermore, it was, uh, more an excuse to enjoy the sights at the water park than it was a workout. The water slide was a hit as well as the manly scenery. Dad bods galore! But that was about it for rides that far east.
Although there were occasional forays up Altamont Pass, riding out that way only started to take off in the Aughts with Mines Road becoming an annual ride and occasional rides up Altamont or Patterson. To my knowledge no one was taking on Corral Hollow or Del Puerto Canyon except Will or Jerome (or me). There’s good reason to avoid riding near Livermore: summer and early fall the conditions can be atrocious due to incredible heat. Being truly rural areas there are almost no services, which meant that getting in trouble—running low on water, getting a flat or worse—was serious business and having to depend on the kindness of strangers.
But when the rains come those sere, brown hills rapidly sprout grass and become a lush green paradise by early January. So the period from the New Year’s to about mid-April is the best time to ride out there.
If you have ride exclusively in urban or suburban areas, truly rural areas can be a shock to your system but in a good way. Although you still have to contend with occasional cars, it’s not at all like riding in the suburbs—rural roads have little traffic. Yes, there isn’t much in the way of amenities and you’re left to your own devices but the absence of other humans is very calming!
A convenient place to start a ride in the Livermore Valley is the Ernie Rodrigues Softball Fields. It has a huge parking lot and a restroom. It’s also right at the southern edge of Livermore where the vineyards begin, so it’s easy to take off to Mines, Patterson, Tesla/Corral Hollow, and even Altamont. Yesterday morning it was a crisp 50F at the start and we were bundled up even though we knew that literally within four miles we’d be climbing. We could see a few of the gigantic wind turbines spinning up Altamont in the distance, so we knew there was a wind. But we really couldn’t feel it (yet). It was well before the winery traffic started up so it was quiet and only other cyclists, runners, and dog walkers were up and about. The climb to Patterson is actually two climbs, the first of which is up Cross Road and quite steady and of only moderate difficulty. After a short but fast descent you then get on Patterson Pass Road and the grade gets serious. But it’s not continuous with just two or three humps that get into the double digits. The last one is just before the top. Around the last curve is “Top of the World”, an impressive vista point of the Sacramento Valley. On a good day the snow covered Sierras are visible in the distance. Alas, we weren’t lucky this time. But the view of the Valley always impresses especially given the hills are devoid of development other than wind turbines and power lines. This was a decision point for David—turn back if tired or commit to doing the whole shebang. He was feeling pretty good despite the effort, so onward.
The descent to Tracy is serious if fun. It’s fast. The road is uncluttered and most of the time the sightlines are good. But the pavement varies from egregious heaves to typical county chipseal. You hardly have to pedal at all yet the gradient isn’t so steep that you’re made nervous—you can just let it all hang out. There is one left curve that has huge warning signs with a 20 MPH limit. I imagine that more than one car has flown off the road there forcing the county to put up the warnings. David flew off into the distance while Roger and I kept a more conservative pace descending.
Once you’re at the western edge of Tracy traffic can be pretty bad. Logistics centers for Amazon, Costco, Safeway and probably others as well as depot areas for Tesla, Toyota, and other car manufacturers mean that big trucks rule the roads. There is an oasis: a Valero gas station with a Subway, a taqueria, and of course the obligatory Grab ’n Go gas station shop to get food and drinks. There used to be a Wienerschnitzel too but it decamped for a more central Tracy location. David was already munching on his gluten-free snacks when we arrived. The taqueria was doing land office business. I wanted to check out the fried chicken in the Grab ’N Go, which by the way is stocked with a crapton of fast food—various kinds of fried chicken, taquitos, sandwiches, bagels, packaged salads—as well as the usual convenience “foods”. You are not going to starve here unless you’re a food snob. In the end I grabbed a chicken salad sandwich that I could split with Roger since he wasn’t in the mood for fried food. I so wanted to eat fried chicken! But I admit the thought of having to taste it a second time up Altamont had me choose more wisely. Another time, alas.
To escape the trucks and the boring arterials in west Tracy the solution is to use the California Aqueduct Bikeway. Hardly anyone knows that long sections of the California Aqueduct have service roads that are open to cyclists. There’s no traffic, you’re by the water, and for some reason there aren’t a zillion homeless people living on it. In fact, I haven’t ever seen any homeless camps along the Aqueduct. For a few miles you can have a pleasant roll until you get to Altamont Pass Road. The wind can be daunting at times but today it was mild.
Altamont Pass Road is scary for the first half-mile because it’s essentially a long entrance ramp for I-580. Cars and trucks out of Tracy zoom by in a hurry to get to the freeway. Once past that motor vehicle hell we were mostly by ourselves on Altamont, which climbs at a gentle rate. There isn’t anything out there except ranches, a Waste Management landfill, and the Summit Garage. How can a auto repair business survive in the middle of nowhere? It’s like something out of “Bagdad Café”. One awful change since we were here last is that the county has put in a rumble strip on the shoulder. This totally sucks for cyclists as long sections of the shoulder are now unrideable forcing you into the roadway proper. In certain sections it looks like the county has made an effort to extend the shoulder by paving more to the right, allowing cyclists some escape. But in other sections the rumble strip takes up the entirety of the shoulder. Even though it is legal for cyclists to use the lane, on Altamont Pass cars often speed by making the experience a bit nerve-racking when you know they’re approaching. We hopped over the rumble strip back-and-forth when cars came by.
To return to Livermore you can head straight down Altamont or turn and cross over I-580. We did the latter since it’s nicer plus we’d escape the rumble strip. However like Bear Creek Road or Pinehurst Road near Orinda, that section of Flynn Road has become a massive illegal dumping ground. We saw the usual household items—sofas, love chairs, TVs, refrigerators—as well as constuction and building materials such as roofing shingles in huge piles all the way to the top of Flynn. Like attracts like, so it won’t be long until it all looks like something you’d see at the nearby Waste Management dumpsite. Just lovely!
However the intensely green hills, luckily, paints over that ugliness. At the top we took a breather and enjoyed the view. We could see large patches of purple flowers up on the hillsides—lupine, or perhaps echium? There were a few poppies starting to appear but their heyday is probably a couple of weeks away.
The descent was easy and fast into Livermore and then it was just one little hill before we were back on Tesla Road. The wineries were now fully awake and traffic was heavier but by no means terrible. Back at Ernie Rodriques David was still chipper no less the wear after some serious climbing and long day in the saddle. What a fabulous day to visit the green hills!
This ride morphed overnight into a shorter, easier one after word got out that Roger and I were going to cut it short and do just 40 miles instead of the intended 50. At the last minute David Go. decided to join the ride as his first road ride in over a year due to a wrist injury and was wondering if there was a way to cut the route down even further. The route is “lollipop” shaped and by cutting off the “stick” you’re left with a very nice loop of about 40 miles. Even so David was hesitant as 40 is a lot more than 20. When David did decide to do the ride—and possibly cut it even shorter if he got knackered—Roger Sayre, the ride leader, mentioned it to others and before long there were five of the eight doing the shorter version. So Roger just made it a shorter ride, period.
The part that got lopped is a five-mile section from a residential neighborhood in Fairfield up to Lagoon Valley Regional Park. It’s nothing special: the beginning rolls by houses and strip malls and then crosses I-80 to a frontage road until you get to Lagoon Valley Park. The main benefit is a nice warm up on flats and then small rollers as well as a bathroom stop at a McDo where those who choose to can quickly snarf down an Egg McMuffin to fuel up for the ride. Unless folks had to do more miles it actually made sense to move the start to the park since it is just at the start of Pleasants Valley Road, which was the whole point of the ride and fits in perfectly with our “Eat Dessert First” philosophy.
For those not in the know, which is probably most of you since your cycling world seems to end no further away than Marin, Lagoon Valley is a well used regional park with plentiful parking, picnic areas, trails, and nice mountain biking trails worth checking out. Overall since it’s a better place to start this ride, a good question is: why was the original start in the middle of a no-name residential neighborhood in Fairfield rather than at Lagoon Valley to begin with? After all, Grizzly Peak Cyclists do this ride and they’ve always started at Lagoon Valley.
That’s a long story and highly digressive! The Pleasants Valley loop is hardly my invention—it’s been a Davis Bike Club route for ages and probably for Sacto Wheelmen and GPC too. But I got turned onto it in the ‘80s because of a book. Back then there weren’t the Internet resources we have today to find good bike routes. What did we do? We bought books. Yes, we used books to get our information about rides. As well as paper maps usually from AAA. I know, ghastly primitive, wasn’t it? Randall Braun, who I believe was a Davis BC cyclist, wrote several print books with great cycling routes, one of which was for Yolo and Solano counties. (I believe he’s hanging with the Western Wheelers these days. By the way he’s also the inventor of RouteArrows, those adhesive route arrows that many centuries use.) He wrote up a route that included Pleasants Valley Road but it looped west to the Monticello Dam and Moskowite Corner rather than east to Winters. I led that route for the club under the name “Around Mt. Vaca” since it circles Mount Vaca. (Duh!) I led it several times and never got a lot of interest from the club. But that route traversed the entire section of Pleasants Valley, which was always very pretty during the green season. Unfortunately due to my schedule and some stupidity I was usually stuck riding this route in summer when it could be very warm to face-meltingly hot. It was also prime redneck area, so punishment passes by big trucks with gunracks pulling boats and rusty Chevy Camaros or Pontiac Firebirds were a regular “thing”.
At the same time I had a friend who lived in the Capay Valley north of Winters and I would drive up to Winters and ride from there up the valley to his place to visit. That was my introduction to Winters, which back then really was a prototypical ag town rather than a trendy suburb of Davis with nice restaurants.
The original loop up Pleasants Valley to Moskowite Corner had a restaurant at Moskowite Corner. I forget the name. It always struck me that a diner could actually make a living in the middle of nowhere. But half the place focused on selling bait and fishing goods to the boaters heading up to Lake Berryessa, so maybe that helped kept the place afloat. It was a convenient place to escape the heat temporarily and get a burger or sandwich and definitely something cold to drink. The restaurant didn’t survive and the place closed for a few years. Then it suddenly changed hands and reopened. But it too eventually closed altogether leaving nothing but a deserted building with boarded up windows. When that place folded for good the loop suddenly became a lot harder—hot, no place to get water, long. (There was the Markley Cove store but it was often closed.) At that point we started riding to Winters instead of Moskowite Corners and heading over Cantelow, aka “Cardiac Hill” due to its fame on the Davis Double back to Pleasants Hill and thus the “lollipop” route came into being as a club ride. Winters had the advantage of Steady Eddy’s as a place to get food. Of course today it’s a lot trendier and you can choose from the various restaurants in the center of town.
In 2021 we led that ride as a way to prepare for the virtual Cinderella Classic and that’s how it ended up in its present form. By the way I remember that ride as being pretty tough given how flat the overall route is. I wasn’t in shape and following Will and Stephanie was, well, impossible for me at the time.
Now why did it start in a no-name neighborhood in Fairfield? The original Randall Braun route started in Mankas Corner, which is west of Fairfield in the boonies. Mankas Corner at that time had a store/restaurant and it made a great place to finish the ride and grab something to eat and drink. To get to Pleasants Valley Road he had you start out on quiet country roads—it’s less quiet these days since Fairfield has expanded westward—into Fairfield and cut through that no-name neighborhood to head north to Pleasants Valley.
When I restarted this ride in 2021, I decided that place was as good as any to begin a ride because it was a quiet residential area with plenty of free parking. Plus, the McDonalds was just up the road for a pit stop before starting the ride proper allowing for a nice warm up.
So there! That’s the genesis of this route.
Back to the ride recap: I had actually never parked at Lagoon Valley Park. But I knew from GPC-talk and researching on the Internet that it was $5 exact change to pay for parking there. The big news was that a year or so ago it no longer became possible to park on the street to avoid the fee. And reality never turns out how it’s described on the Internet: the park actually has two separate areas, Peña Adobe and Lagoon Valley proper and only the latter has a pay machine; of course we were parking at Peña Adobe! Oh, and the pay machine at the entrance gate was broken so you had to go all the way into Lagoon Valley proper to find the other machine and then return to Peña Adobe. The parking mishegas led to the latest start of any Different Spokes ride I’ve ever been on in 40 years: ride out was at 10:15 and we didn’t leave until 10:48.
This year there were eight of us—David Go. on his first ride back; Stephanie, who’ll do this route at the drop of a hat; me and Roger; Nancy, who to my surprise had never done this ride before; newbies Will and Jamie; and Roger, the ride leader. Once the ride started most of the group took off up Pleasants Valley while I was panting heavily way behind. I’m never a fast starter and as I get older it takes me longer and longer to ‘warm up’. Sometimes I just never warm up though. Sigh. Pleasants Valley is basically flat but it has a few short rolls that suddenly have you slow down. The road is an undivided two-lane and because it’s a country road there is farm traffic and day tourer traffic and those little hills are blind spots to oncoming traffic. Traffic was heavier than usual—was it because it was a Saturday or because we had started so late? At one point a rally of Corvettes came zooming up behind us just as the front of our group was climbing one of those rollers. To my utter shock the lead car actually slowed down and waited before passing! The usual behavior is to go for it and pass regardless of not being able to see ahead.
At another roller Stephanie slowed down and waited for us at the top. From then on we were more or less together enjoying the intense greenness of the valley. Just five years ago the LNU Lightning Complex Fire roared through here and burned off almost all the tops of the hills and even made its way down to the road. When we were here in 2021 it was unnerving to see the damage the fire had wrought. Now it all had disappeared under four years of growth and rain with the only silent testimony being a few huge piles of logs by the side of the road, undoubtedly the damaged trees having finally been cut down. It all looked very normal now except for the tops of the hills being denuded of trees and replaced by grassland.
Just for old time’s sake we had a white Cadillac Escalade roar past us at about 60 MPH keeping us tightly pinned to the shoulder line!
On Putah Creek Road we saw a slender, furred creature scamper across the road towards the creek. We were all puzzled—what was it? A ferret, a mink, or what? At lunch after a little Internet research we concluded it was a mink. That’s the first mink I’ve seen that wasn’t on someone’s shoulders!
Winters was humming on Saturday. The Putah Creek Cafe and Buckhorn Steakhouse both looked busy. Surprisingly Steady Eddy’s, the usual cyclist watering hole, was not. We rolled in, got a table outside, were able to order inside with no line immediately! As much as Steady Eddy’s is an okay stop, the better place to grab a meal was the El Pueblo Meat Market down the street. Their burritos were excellent. But they didn’t survive the Pandemic so it was back to Steady Eddy’s. Mealtime gab revolved around—what else? recovering from injuries: pain meds, PT, overdoing it, A-fib, knee replacements, etc. as well as…German bread or the lack thereof of any in the Bay Area. No one had heard anything good about German bread. But we knew better—it’s some of the best around. And there just aren’t any German bread bakeries, which is shocking for foodie central Bay Area. Except in Vacaville…
Post lunch the clouds were beginning to gather. The day had never been very warm; David was the only one to venture out dressed in shorts and a shortsleeve jersey. The wind from the west was picking up as headed out. Every now and then some very light drizzle was spit out. This part of the ride is actually very nice. The roads heading south out of Winters are all originally farm roads and they are very flat, flatter than Pleasants Valley by far. We were in a double paceline for quite a while, people chatting away in pairs. All the roads out there are of uneven quality, from alright to pretty broken up and choppy in areas. Years ago we would all have been on 20 or 23 mm tires but today everyone was on something 28 mm or bigger. Roger, Nancy, and Stephanie were on 32 mm tires. We are accepting the hard reality that county roads are never going to get better, only progressively worse and the best way to deal with it is to get wider tires and run them at lower pressure in order to preserve our butts, backs, and wrists.
Turning westward we got into the English Hills but instead of continuing on to Cantelow, aka ‘Cardiac’ we continued south on Gibson into Vacaville. Gibson is still a hill, just less of one than Cardiac, which hits about 10% at the top. The trade-off is that Gibson being a more direct route into Vacaville also has more car traffic. Without a decent shoulder and some blind curves this requires vigilance to stay alive. Of course not long after we were on the climb up Gibson a wave of cars came by, impatient and speedy, gunning their engines. Unlike the Corvettes the lack of a clear sightline was no deterrence to their passing. Popping the top we regathered and then bombed down hurrying into downtown Vacaville. Why the rush? To get to the Pure Grain Bakery and Café, which happens to also be a German bakery!
Although neither Roger nor I had ever been to Pure Grain—two years ago I knew it was there but I didn’t know the address—we were keen to try out their bread. They also make pastries and that got the group interested in a coffee and pastry stop and convinced them to trot along after us. It turned out to be a hit. There’s a nice open area with picnic tables just outside under the pear trees. Unfortunately Pure Grain’s more traditionally German offerings are only baked during the week; that didn’t deter me. We bought a large loaf of rye and a three-grain. With artisan bread hitting $10 a loaf (usually small) getting homemade bread for $6 was a steal! Most of the others got pastries. But after seeing the loaves we bought soon everyone was heading in to get their own loaf!
After a rather long break we noticed the clouds getting darker and a few drops were starting to appear. Fortunately the parked cars were just a couple of miles away and we made it back just before it started to rain.
Postscript: the rye bread is awesome—smooth flavored! Pure Grain is too out of the way for it to be a regular stop for us. But maybe this will be an added incentive to ride more out there! (And Fenton’s is just up the road too for a Black & Tan fix!)
I’m fixing a hole where the rain gets in And stops my mind from wandering Where it will go —Lennon/McCartney
Once you’re back home you can patch the punctured inner tube. You’ll be less pressured and can do it in an unrushed, orderly fashion, which will assist in you doing it correctly and avoid having to repatch the tube.
Extreme example of exploded tube–can’t be patched!
Is The Tube Salvageable? Not all tubes can be patched and not all tubes are worth patching. If the puncture is large i.e. a long gash or the tire deflated due to an explosive failure, it’s not worth patching if it’s even patchable at all. What can cause your tire to explode? Overinflating your tire is one way: the pressure is just too great for the tire and it can’t hold the tube in place. This can happen due to overpumping. A common way this happens is inflating your tire at a gas station air pump. These pumps put out very high pressure and your tire is at the proper inflation level very quickly, more quickly than you realize. It’s generally very hard to overinflate your tire with a regular a frame pump. But some floor pumps today can pump up to over 160 psi, which is quite high. Absolutely respect the tire pressure range recommended for your tire. Another way you can explode your tire is if the inner tube wasn’t entirely inside the tire, i.e. part was trapped under the bead. A tire casing failure can also happen leading to an explosive release. This can happen if your tire is very old, you’ve worn the rubber down to the casing, or you’ve damaged the casing. Sometimes the tire sidewalls get damaged by abrasion or by riding your tires underinflated. This causes the sidewalls to flex excessively and fray. An exploded inner tube results in a long tear or hole that cannot be patched.
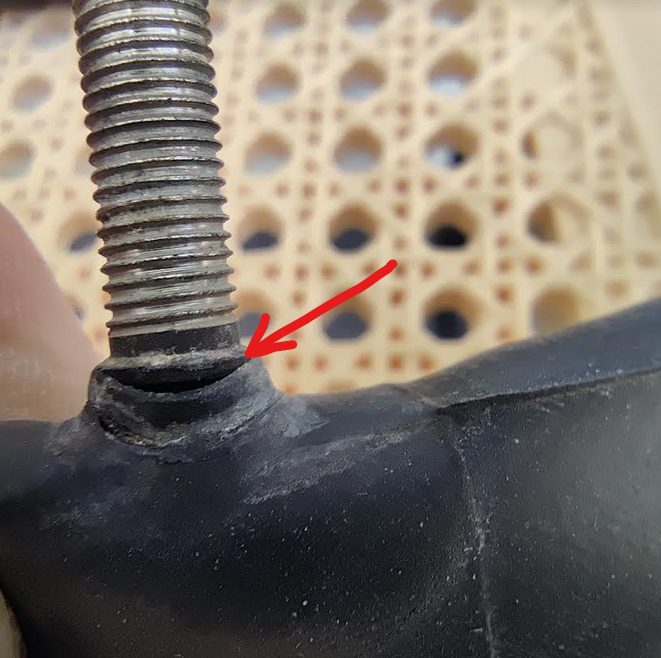
Presta valve pulling out of tube
Another inner tube that cannot be patched is if the tube failed at the valve. It’s not possible to put on a patch when it’s too close to the valve hole.
Some tubes are probably not worth patching. If your tube already has a lot of patches on it, you’ll want to consider if it’s time to toss it and just put a new tube in your saddle bag. That said, tubes can take as many patches as there is space. Patches adhere best when they are attached just to the tube. If the new puncture is close to an old patch such that you’d have to put the new patch on top of an old patch, these patches often don’t adhere as well as directly on the tube. You can try it but the patch may eventually fail.
Assuming you do successfully patch the tube, I recommend that you reinstall it in the tire and take the previous spare tube out to use as your spare again. This is so that your spare is always a “clean” tube with no punctures in it.
Patching an Inner Tube. Although you located the hole in your tube while on the road, you’ll probably need to do it again once you’re at home. The first time was so you could locate the hole in the tire and remove the piece of glass or thorn before installing your spare. This time you need to find the hole in the tube again in order to patch it.
Air bubbles from a leak
Gently pump up your tube and then listen for a hiss or feel the tube for any leaking air exactly as you did while on the road. Once you’ve located the hole again, use a Sharpie or ink pen to mark the pinhole this time. If you can’t feel or hear the leak, then the next step is to fill a wash basin with water, inflate the tube to a few pounds of pressure, close the valve tightly, and then submerge the tube in the basin to look for bubbles from the leaking air. Starting at the valve submerge just a section and look for bubbles. Note that bubbles of air sometimes are attached to the tube simply from dipping the tube under water. These are not from a leak. Of course you won’t know if that’s the case. So if you see bubbles on the tube, it could be from that or a very slow leak. So brush the bubbles away and see if new bubble form. If they do, then you have a leak. Other times it’s quite obvious where the leak is because bubbles will be rapidly expelled. Now note where the bubbles are coming from, remove the tube from the water, wipe it dry, and mark with spot with a Sharpie.
Another possibility, which should be obvious when you’re inspecting the tube, is that you have incurred a ‘snake bite’ puncture. This happens when you hit something with a sharp edge such as a pothole or a rock. The tire completely compresses at the rim with such force that it cuts through the tube in two places, one directly under the other on the tube. This will look like two small cuts very close together. If you’re lucky, the two punctures are very close together and you’ll be able to cover them both with one regular patch. If they’re further apart, you may need to use two patches. Some patch kits includ oval as well as circular patches. The former are for longer cuts or for snake bite punctures. Repairing snake bite punctures calls for the same procedure with the added precaution of covering the larger area completely with glue.
But don’t stop now. You want to inspect the entire circumference of the tube because there may be more than one puncture. So keep pushing the tube under water section by section repeating this procedure. If you find another puncture, mark it. Then dry off the tube.
A failed patch. Occasionally an old patch will fail. This is rather common with glueless patches but it also happens with regular patches. The patch didn’t completely vulcanize to the inner tube and eventually it can fail. Usually this is due to putting the patch on before the glue has set enough, waiting too long for the glue to set before applying the patch, the site not being adequately or completely covered with glue, or insufficient pressure being applied to the patch to get it to adhere. It may work temporarily but a hasty or inadequate patch job may eventually fail. If you find the leak is coming from under an old patch, don’t try to put a patch over the patch! Vulcanizing glue doesn’t do a very good job on a patch and the second patch will very likely fail. Instead remove the old patch and then repatch the site. This may be difficult but it’s doable; you’ll have to completely remove any residue of the old patch and the glue for this to work. Follow the same instructions below after you’ve cleaned the site completely.
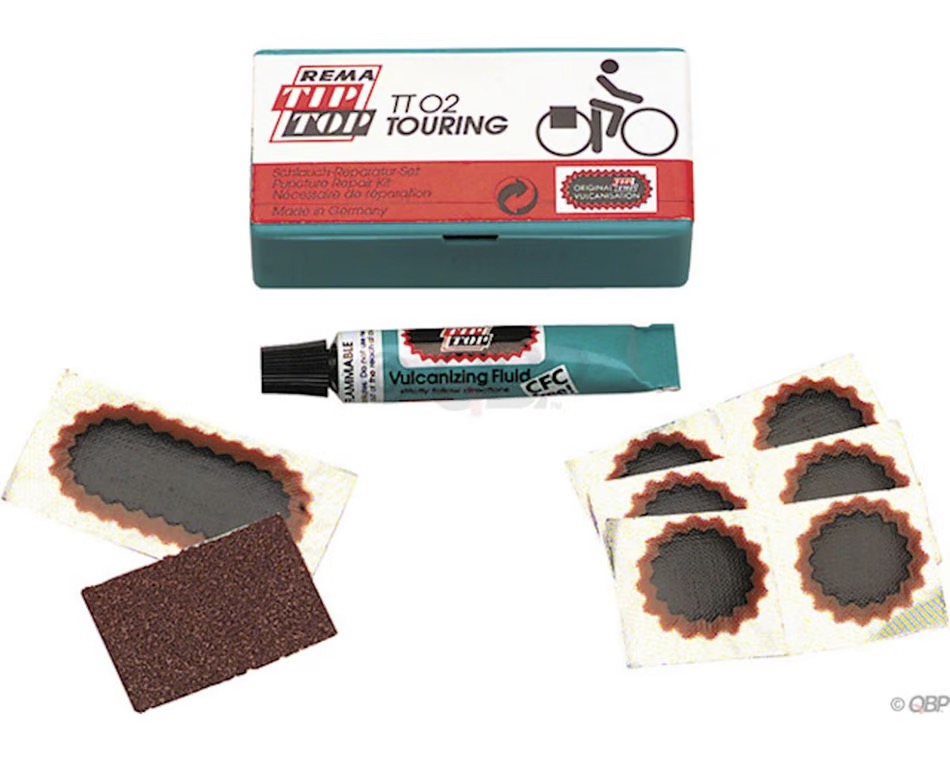
Rema Tip Top patch kit
Patching a tube. You’ll now need to follow the instructions for patching the tube, which are almost always the same for butyl or latex:
If there is any dirt, liquid, or oil on the area around the puncture, you’ll want to clean it all off.
Use the included sandpaper to roughen up the area around the hole for the entire area the patch will cover. You don’t have to rub too hard. But you do want to have ‘fresh’ rubber. If it’s a latex tube, you’ll want to go easy on it because they are highly elastic. Some patch kits don’t include sandpaper but instead a small metal rasp to roughen up the inner tube surface.
Use the tube of glue; if it’s not open yet, you’ll want to puncture the sealed opening with the point in the cap. Then apply a layer of glue to the area around the puncture. Be sure to cover an area larger than the patch. It doesn’t need to be a lot of glue—just smear it with the mouth of the tube as you apply the glue; if you put down too much it will mean you have to wait longer to let it dry. Do not blow on the glue to attempt to get it to dry ‘faster’—it won’t and the moisture from your breath hinders the bond.
Now wait for the glue to dry until it just stops being tacky. At this point you’ll apply the patch. If you wait too long and let the glue overdry the patch may not adhere well, so don’t go away and then come back.
Patches have a covering over the sticky side that you’ll have to peel off before you apply the patch. Rema patches have metal foil. Rema Tip Top patches also have a thin, peelable covering on the top of the patch. If you’re using Rema patches, you can leave that peel on the patch; just remove the foil backing. When you’re ready to apply the patch, peel off the backing and put it over the puncture with the puncture in the center of the patch. If the patch is on any part of the tube that didn’t have any glue applied, it won’t stick there and acts as a weak point. After the tube is reinflated that part of the patch may start to pull away from the tube and may lead to a ‘tunnel’ forming from the edge of the patch to the puncture causing a leak. If you do have a dry spot, you can try to quickly apply just a tiny bit of glue there and pressing the patch down firmly.
Now press down very firmly over the entire surface of the patch using the blunt end of a tire lever or a spoon to press down and roll over the entire patch taking particular attention to the edges of the patch. Take your time. Check that the entire edge of the patch is sealed to the inner tube surface. You might be tempted to try to inflate the tube to see if the patch is leaking. Don’t! Just visually inspect it. The purpose of the glue is to vulcanize the patch with the butyl or latex rubber; essentially the patch is becoming part of the tube rather than being adhesively attached. If the vulcanization is not finished, then inflating the tube may allow the patch to tear apart from the tube. There is one thing to be cautious about: tubes intended for smaller tires such as 20-, 23-, and sometimes 25-mm tires are slightly harder to patch than for larger tires. When you’re patching a tube, ideally you want the area being patched to be completely flat when you press down on the patch. For bigger tubes this is not a problem because the area to be flattened is bigger than the patch. But tubes for smaller diameter tires, when you press them flat on a table, are actually not as wide as the patch. So the patch is going to curl around the tube. When you apply the patch and press on it, you will have to roll the tube slightly to press on the two edges that curl under the tube. Do this carefully yet forcefully. That curling makes it harder for the patch to attach to the tube. Fortunately most patches have a feathered edge so they are thinner at the edge of the patch than in the middle. This makes it easier for the patch to curl around and to vulcanize with the tube. If you are using a larger oblong patch to cover a bigger tear or a snake bite puncture, it is almost impossible to apply the patch to a small diameter tube since these patches are generally thicker and won’t curl as easily. If you can, apply the patch longitudinally to the tube. If you can’t because of the dimensions or location of the puncture(s). you may find it hard to get the patch to adhere and seal adequately.
If you are going to install the tube back into your tire, you can start doing that now. If you are using Rema patches, you can leave the clear backing on the top of the patch in place; you don’t have to remove it. If you do remove it, I recommend that you then dust the area with talc ie. ‘baby powder’. This is because any exposed glue can actually start sticking to the inside of the tire. The backing helps prevent that. If the glue does stick to the tire, it’s not a problem. But it does prevent the tube from moving easily inside the tire and you may find that when you have to remove the tube the next time you have a flat, you’ll have to peel the tube out of the tire.
You can store the repaired inner tube as your spare. But I recommend that you reinstall the patched tube and remove your original spare so that it remains pristine. (Obviously if your spare was patched before, there’s no reason to do this.)
It is possible that your patching will fail. Perhaps you didn’t cover the whole area with glue, you didn’t press the patch with enough force (it doesn’t require much though) or over the entire surface of the patch, or the glue was too old. If the surface of the tube was contaminated, it’s also possible for the vulcanization to fail. So it’s important to keep it clean and dry before you attach the patch and glue.
Finally your tire may still leak because your tube actually had TWO holes and you only patched one. If you’ve ridden through a patch of glass or thorns you may have found one puncture but didn’t inspect further for another hole when you got home. So don’t skip that step above. This can also happen if you incurred a snake bite puncture but didn’t notice that and covered only one of the two punctures.
What if my patch fails? Sometimes despite your best efforts your patching fails. If you stick the tube into a basin of water, you probably will see a leak coming out from under the patch due to insufficient glue, waiting too long to apply the patch, not waiting long enough before applying the patch, or not pressing firmly enough. This is often due to rushing a repair. It’s important to be orderly and patient in patching—don’t rush it! If you want, you can attempt to repair the puncture again using the same procedure. Most patches will tear off easily (but some don’t!) and you can start over again. Just make sure to remove as much of the glue and tidbits of the edge of the patch from the tube before your second attempt. Note that sometimes the patching seems to have been successful. But the tire is flat the next day. If it’s not due to another leak you didn’t discover, it’s usually because it took time for the air pressure to force out and tunnel to the edge of the patch. The remedy is the same: make sure you have the area completely covered in glue and to wait the appropriate time before applying the patch and pressing firmly and completely.
Why patch? You don’t have to patch a punctured tube. There are butyl tubes that are quite inexpensive and you may find it less hassle just to toss the punctured tube and get a virgin tube for your repair kit. This is especially true if you buy tubes in bulk quantities to save money. If you prefer using extralight butyl tubes or latex tubes, you may find it too expensive an option to toss them right away.
About patch kits. Patch kits include a small tube of glue and several patches usually in two sizes, circular and oblong. These kits often sit in your saddlebag, get jostled around, and they will age. Although the glue is inside a sealed metal tube, it still can slowly lose solvent and become useless if left alone long enough. You can check the tubes occasionally to see if they are dried out. If you press on an unopened tube and it collapses, it’s probably lost solvent and is suspect. Get a replacement tube of glue for your patch kit. Why are you concerned about this? Because sometimes circumstance will force you to attempt a patching while you’re out riding such as when you have multiple punctures and don’t have enough spare tubes with you. Of course the first option if you’re riding with friends is to cadge a spare tube from someone else. But that’s not always possible. Another is to flag down a passing cyclist and ask for their spare tube. But unless they are Good Samaritan types they are not going to give up their good tube to you.
Note that once you puncture and open a glue tube it will now dry out faster as the solvent can more easily escape. Check a previously opened glue tube more often to see if it has dried out. If it has, you can buy a separate tube without having to spring for an entire patch kit.
Glueless patches. You can also purchase patches that don’t need glue, so-called ‘glueless patches’. These are patches that have a special adhesive on the patch and you can apply them directly to the tube without using any vulcanizing glue. These are usually sold with the caveat that the repair is temporary only and not permanent. Because you’re not using vulcanization to attach the patch, this glue bond is not as strong and often will eventually fail. But these patches are useful and quicker to apply so much so that you can effect a quick repair albeit temporary while still riding. The basic idea is the same: use the small piece of sandpaper to roughen the area around the puncture, remove the backing from the patch and apply, then press firmly.
If you’ve cleaned the tube surface well and pressed firmly on the patch, these glueless patches may last indefinitely. But a good percentage of the time they fail within a relatively short period, a few days or weeks. This is because the adhesive isn’t strong enough to withstand the pressue in the tube and air eventually tunnels out to the edge of the patch and escapes. If you need to replace a glueless patch, they are fairly easy to tear off. Then replace it with a regular patch.
A note about patching latex tubes and TPU tubes. Latex tubes are patched exactly the same way as butyl tubes. However there is one characteristic of latex tubes that makes this slightly more difficult than with butyl tubes. Latex rubber is stretchier than butyl rubber. This resilience provides the unparalleled comfort that latex tubes are known for. This stretchiness makes inflating a latex tube outside of a tire difficult sometimes. No tube has completely uniform thickness and with latex this means that areas of the tube that are thinner or more flexible will expand and balloon before the rest of the tube. You will end up with one section looking like a sausage and the rest of the tube barely having any pressure. This may happen when you are inflating a latex tube to look for the puncture site making it difficult since the site could be anywhere on the tire and the pressure may not be enough to make the leak obvious. If you can’t find the puncture site, you may have to submerge the tube in a basin of water to look for bubbles.
Ordinary patch kits will not work with TPU tubes because TPU is not a kind of rubber. Brands of TPU tubes make their own patch solutions and they may not be compatible with other TPU tubes. For example, Tubolito and Rene Herse patch kits are different. You will have to refer to the company that makes your TPU tubes for advice on patching.
Removing your spare from a tubeless tire. If you installed a spare tube in a tubeless tire while on the road, you’ll find that it’s a mess when you get home because of the sealant now coating everything. If you flatted your tubeless tire because all the sealant dried up and there wasn’t any to seal a puncture, then your spare luckily is not going to be a mess. But if there is still sealant in the tire, your spare is now covered with it. Most sealants are water soluble and will wash off. You can also let it sit on the workbench until dry and then you can peel the dried sealant off later on and then pack up your spare again.
I’m fixing a hole where the rain gets in And stops my mind from wandering Where it will go —Lennon/McCartney
Reinstalling your wheel. For a front wheel with rim brakes your quick release should be loosened enough to go over the lawyer tabs. It’s best to stand the bike upright when you go to insert the wheel. Stand on the left side of the bike and hold the front of the bike up; with your other hand put the wheel into the dropouts and let the bike settle on the wheel in order to ensure that the wheel is completely seated in the dropout. Then screw in the end nut so that when you tighten the quick release it grabs firmly onto the dropouts. (The bike still be balanced on the wheel axle so you can use both hands to screw in the end nut.) Remember: a quick release is not a wingnut so screwing in the end nut is not sufficient. You have to screw it in enough so that you can move the lever 180 degrees to cam onto the dropouts tightly. And the lever should not stick out but be parallel to the bike. When you removed the wheel you probably had to open the brake calipers to get the wheel out, so push the button or turn the lever that moves the calipers back into place. If you forget to do this, your brake will not function correctly. Then spin the wheel to make sure that it’s not rubbing the brake pads or wobbling. It may be that you don’t have the wheel inserted into the dropouts fully and the wheel will either appear to wobble or it might hit the brake pads. If so, open the quick release and tighten it again while the bike is standing up so that gravity can force the wheel fully into place.
Clamp the quick release correctly!
For a front wheel with a thru axle insert the wheel into the dropouts making sure you insert the disc rotor carefully into the brake rotor slot. If you do this carelessly, you can bend your rotor. Then insert the thru axle and follow whatever procedure your brand requires. Most just require screwing the axle in until it’s tight. But some have proprietary levers that latch in place. You do not want a loose thru axle!
For a rear wheel with a rim brake the procedure is the same as a front wheel except there are no lawyer tabs to deal with. This is a little trickier than a front wheel because you have to stand the bike up while inserting the wheel and dealing with the rear derailleur. Hold the bike up with one hand and put the rear wheel under the rear triangle. Now you will have to pull the rear derailleur body back a bit to get the chain around the cassette. Also make sure you get the chain on the correct cassette cog. The wheel should go into the dropouts easily. If not it can be due to the chain not properly wrapping around the cassette (e.g. it’s on wrong cog), the chain being trapped between the smallest cog and the dropout, or the ends of the quick release interfering with one of the dropouts. Remove the wheel and try again if necessary. You may have to loosen the quick release nut some more, push it one way or the other, or just remove it entirely in extreme cases to get the axle back in the dropouts. Make sure your brake calipers are set correctly if you opened them when removing the wheel.
For a rear wheel with a thru axle, insert the wheel into the dropouts as with a rim brake wheel above but also making sure the disc rotor goes into the brake rotor slot. Then insert the thru axle and tighten per your brand’s instructions.
For any wheel the final steps are to spin the wheel to make sure the brakes aren’t rubbing and in the case of the rear wheel to make sure your shifting is alright.
When your chain falls off the chainring. Anytime you remove a rear wheel the chain is no longer under tension and can easily fall off the front chainring. This can happen if the crank turns backwards and unships the chain. Of course the obvious prevention is to be careful not to let the cranks turn backwards. But if the chain does fall off, simply place it back on the correct chainring. In order to keep your hands clean you can use a tire iron to grab a chain link with the spoke hook end and pull it onto the chainring. Then run the crank to spin the rear wheel to ensure the chain is in place on the chainring as well as on the cassette in back. Or, you can carry latex gloves to keep your hands clean while you put the chain back on. Gloves are generally a good idea for any on-road repair to keep your hands from getting grimy
Ready to ride. At this point you’re ready to continue your ride. But you should start a bit slowly in order to check that everything is fine, specifically that the drivetrain has been put back together correctly (if you removed the rear wheel) and that the brakes aren’t rubbing the rim or disc rotor. This is also when you’ll check for a hop in the wheel if you weren’t able to seat all of the tire bead fully onto the bead shelf. You also want to be attentive to whether the tire starts to feel “odd”: if a part of the tube is still stuck under the bead, pressure may force air out from under the bead and it will move the tire over. Tires don’t always explode immediately. Sometimes it takes some time for the air to be forced out from under the bead at which point it will rapidly get worse and explode. So as you start riding you’ll want to be attentive for that possibly taking place. If you do feel this happening, then stop and quickly deflate the tire. You’ll have to go back to trying to get the tube back into the tire.
Gene Howard, last finisher at the first Bike-A-Thon 1985
While today is a Monday, in 1984 and 2007 it fell on a Saturday and both dates had club rides that we happen to have pictures of.
March 17, 1984 Lake Chabot rideLunch at Lake Chabot: Tom, Michael, Dave, Gene looking dour, John St. Denis
In 1984 John St. Denis led a club ride to Lake Chabot for a picnic lunch. Accompanying him were Dave Gilchrist, Tom Crites, Michael John, and Gene Howard—all early members of the Different Spokes. Michael John served as club president and also as newsletter editor for the early ChainLetter. He also created many of the early club trips such as the Russian River/Guerneville Weekend and the Apple Blossom, was instrumental in organizing the first AIDS Bike-A-Thon, and led a slew of self-contained bicycle trips around the US. (We will soon hear more from Michael!) Tom Crites’s home in the Castro was the location of the early club garage sales. When the club was starting up, money had to come from somewhere and just like today membership fees weren’t enough. Dave Gilchrist was also in the early cohort of bicycle tourists in the classic sense: load up your panniers and go for a trip. If you attended the 40th Anniversary Bash at il Casaro restaurant in 2022, you had a rare chance to meet Dave; being a sailor he’s often away on his boats. Gene Howard, the “old dude” with the fetching beret was a retired school teacher, and was the oldest participant at age 64 and the last person to arrive at Molly Brown’s in Guerneville for the 1985 AIDS Bike-A-Thon. That’s a picture of him above at the BAT ceremony after the ride. A really sweet guy, unfortunately he died in a house fire in 1998. I have no idea what happened to John St. Denis.
1984 Club Garage Sale at Tom Crites’s garage
In 2004 Will Bir was deep into long distance cycling and he led a club trip to do the Del Puerto Canyon loop. Will probably got the idea from doing the Del Puerto Canyon century, which no longer is offered. It starts in Patterson and goes up Del Puerto Canyon Road—a beautiful, isolated country road—to Mines Road, down to Livermore and then back to Patterson.
Del Puerto Canyon in spring
Surprisingly three other members joined him for this very long ride—Jeremy Jacobs, Mark Hotsenpiller, and Jerome Thomere. Well, actually Jerome isn’t a surprise since he was often doing centuries and doubles with Will back then. Those were the days when riding centuries was still popular in the club. March was a good time to ride Del Puerto Canyon because it can be very hot in summer whereas in spring it’s not just cooler but also a lot greener and prettier. I’m not sure what happened to Mark and Jeremy. Jeremy did a lot of club rides for a few years and then vanished; ditto for Mark.
Jeremy, Jerome, Mark…and Will (at the Junction Cafe)
If you’re a Different Spokes member, you can see more pictures of the 2007 ride in the club photo albums on the website.
I’m fixing a hole where the rain gets in And stops my mind from wandering Where it will go —Lennon/McCartney
Inflating your tire while on the road. You should be carrying some kind of inflation tool with you along with your spare tube, mini tool, etc. This is true even if you are using tubeless tires. Although tubeless tires reduce the number of roadside flats, that number isn’t zero. With tubeless tires you may not get a completely flat tire yet the pressure is very low by the time the puncture has sealed and you may want to pump more air into it. If you had to use a tire plug to seal a leak, then you definitely have a flat tubeless tire and will need to inflate it. If you have tubed tires, then replacing the flat tube with a spare but having no means to pump it up leaves you in exactly the same situation: a flat tire (but this one has no hole in it!)
The most common inflation tool is a portable hand pump. But there other tools: CO2 injectors, portable battery powered pumps, foot operated pumps, or gas station air hoses. You should be familiar with whatever inflation tool you carry. Even hand pumps have brand-specific idiosyncrasies in how to use them properly. So read any instructions you get with your pump.
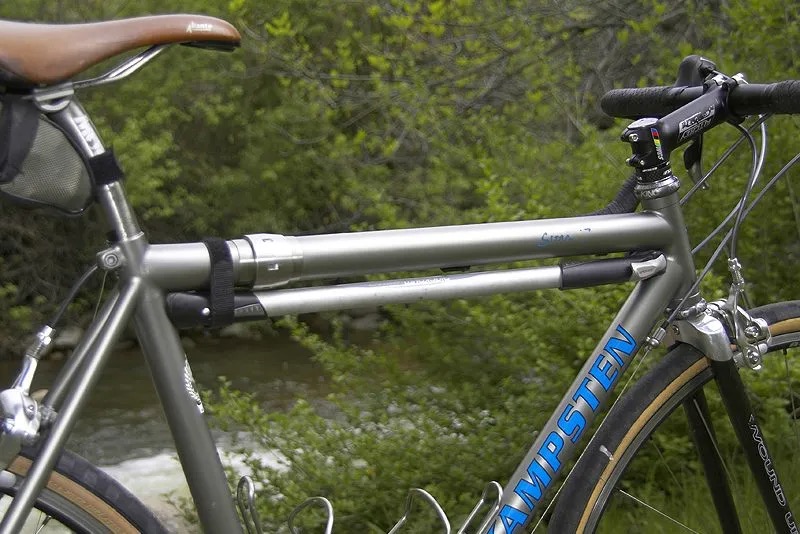
Frame fit pump
Hand pumps. Hand pumps come in a huge variety of sizes. Back in the day the most common kind for “ten speed” bicycles was a “frame” pump. It was called that because the pump was sized to fit in the main triangle of your bike, either parallel to the seat tube or the top tube. (Some cyclists put them parallel to a seat stay. These pumps either attached to the frame between pegs or the pump had a spring in the handle that allowed it to fit directly in the main triangle without any pegs. Hand pumps either had a head that you attached directly to a tire valve or it had a short hose from the pump to the valve. One advantage of frame pumps is that their longer size allowed you to pump more air into the tire with fewer strokes.
Now we have hand pumps that run anywhere from about six inches in length up to a frame size and everything in between. The general rule is that the smaller the pump, the more strokes you’ll be doing to inflate your tire. Some small pumps can extend open so that its barrel becomes longer and can inject more air with each stroke yet they collapse down to a shorter length for portabililty. Of course the smaller the pump, the lighter it is and depending on how you plan to stow it, it could be really helpful to have a small pump. If you want it to fit in your jersey pocket, it needs to be short versus fitting it on your bike where length is less critical.
The quality, longevity, and convenience of a pump is highly idiosyncratic. I’ve been through several mini pumps that were inadequate either because they were difficult to use or hold, they had terrible heads, or they couldn’t get a tire up to the pressure I wanted. Some folks don’t mind having to pump 250+ short strokes to inflate a tire whereas others prefer less than a hundred long strokes with a frame pump. Keep in mind there is a time factor: it will take you quite some time to pump 250 strokes; 80 or so is a lot quicker. Very generally speaking I’ve found mini pumps from Silca, Lezyne, Blackburn, and Topeak to be alright.
Hand pumps also vary by the type of tire you use. Mountain bike tires have much greater volume and are inflated to much lower pressure, generally less than 35 PSI; road tires run anywhere from about 50 to 120 PSI; gravel tires are in between. The higher a pressure you need to attain, the harder it is to inject air; the more air you need to inject, the more strokes you’ll need to produce.
If you have a big tire to fill, a small pump will require a lot more strokes to reach adequate pressure. So pumps intended for mountain bike tires tend to have bigger air chambers to push more air (i.e. usually the pump barrel is deliberately wider.) Pumps for road tires tend to have narrower chambers. But of course this is all relative because it’s the volume of air you are pushing in one stroke that affects effort. So having a wider barrel but a shorter length (or even just pumping half the length of the barrel) accomplishes the same thing as having a narrower barrel but a longer length. Pumps for road bikes are designed to be able to pump to higher pressure whereas mountain bike pumps generally can’t.
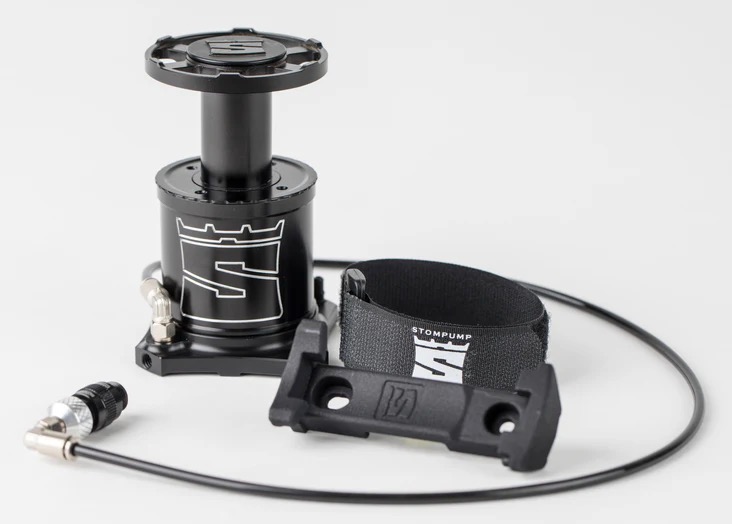
Portable foot operated bike pump
Foot pump. Foot pumps have been around for a long time. Instead of using your arms you use your leg to work a pump. Since your leg muscles are larger (and trained by cycling) foot pumps can be less tiring to use. The problem is that they have heretofore been designed to be used at home for automobile/motorcycle tires. Now there is a portable foot pump for bicycles, the Stompump. I haven’t used it so I can’t comment on how effective it is. It’s more expensive than a good frame pump but not excessively so, about $60.
CO2 injectors. I covered CO2 cartridges in Part 1. Here are some additional remarks. The main advantage of CO2 injectors over pumps is effort: you do not have to pump. If you have limited upper body strength or range of motion, then CO2 may be better for you. An injector and two CO2 cartridges is likely lighter and smaller, more packable than a pump. the main disadvantage is that after you use your cartridges you have no way to pump up your tire. If you prefer the convenience of CO2 yet do not want to be stranded, you can pack two or more cartridges and even a small pump too. You’ll be able to pump your tire up easily with CO2 but also have a pump in case you want or need to add more air or you run out of cartridges.
Although CO2 is not harmful to butyl or latex rubber it is more permeable through rubber than air is. So your tire will deflate more rapidly. If you use CO2 and wait overnight the tire is going to be pretty deflated the next day. You may think that the tire has a flat or an old patch on your tube has gone bad. But it could just be that the CO2 has leaked out. Just deflate your tire when you get home and inflate it with regular air. If you used CO2 to inflate a tubeless tire that had a leak, CO2 can damage sealant. So when you arrive home you should completely deflate your tire to remove the CO2. When you release the CO2 into your tire the gas is very cold. That rapid chilling alone can damage some sealants so you should inspect your tire at home to see if you need to remove and replace the sealant.
CO2 and TPU tubes are another matter. According to Rene Herse Cycles, who produce and sell their own TPU tubes, the rapid chilling caused by compressed CO2 makes the TPU more brittle and the rapid increase in pressure can then “break” the tube. They don’t say anything about using an injector with a regulator, which allows you to release the gas into your tube more slowly, whether it might be safer. They just don’t recommend using their TPU tubes with CO2. Whether this also applies to other brands of TPU inner tubes isn’t clear.
Keep in mind that a CO2 cartridge is metal and it also will get very cold when you release the gas. Some injectors cover the cartridges but many do not.
Battery powered portable pump
Electric Pumps. The new kid on the block is the battery powered, portable electric pump. These are quite compact and light due to the lithium battery. Depending on size they are good for a couple of tubes or more before you need to recharge the battery. They usually have a built-in gauge; you set the target pressure, turn it on, and it runs until it reaches its goal. Very convenient. They can be lighter than a mini pump too. The motor is small so it takes some time to reach higher pressures. But your arms aren’t tired! They’re now coming out of China in scads so buyer beware. They cost about $100. Popular brands include Fumpa and Cycplus.
Gas Station Air Hoses. If you want to pump up your tire, a gas station with an air hose is very tempting. Although the number of gas stations is shrinking, there are still a lot of gas stations around. A few caveats. First they all have heads that fit only Schrader valves so they will not work with Presta tubes unless you happen to be carrying a Presta-to-Schrader adaptor in your saddlepack. Second they send out a lot air quickly because they are intended for car tires, which have a much greater volume than bicycle tires. If you are not careful you can explode your tire. Third, the gauges on these air hoses are of unknown reliability. It may say your pressure is 50 PSI but it actually might be something else. So relying on the gauge to measure how much air you’ve put in is sketchy.
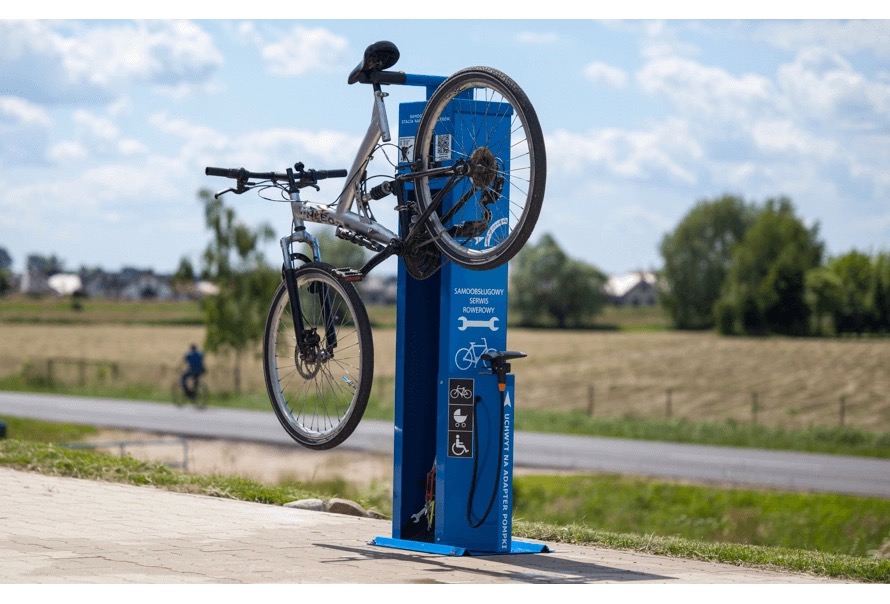
Public bike station with track pump
Public bike repair stations. Self-service bicycle repair stands are becoming more common, They are usually installed along well used bike trails and frequented spots such as at parks or trailheads. They include a few common tools such as Allen wrenches, a stand for holding your bike, and a built-in track pump. I’ve used these a couple of times and they can be quite convenient. Although well-built and robust the condition of the pump varies. On some the gauge may either be broken or so scratched you can’t read the numerals. But they are another source of on-the-road air.
Track Pumps. If you already own a pump, this is probably what you have. It’s not designed to be carried on the bike but used at home or in a shop. But this is what you’ll see if you take your bike to a shop; there are usually track pumps on the floor for customer use. Bicycle shops almost always have air compressors in the repair area. This is just an electric powered motor that compresses room air into a cylinder for use in the shop where they are always needing compressed air for inflating tires, blowing parts, and cleaning. You won’t be allowed to use it but the employees might use it to inflate your tire if there aren’t any free track pumps.
Redwood Road reopened in mid-February after more than two years of closure. We went there to check it out.
Redwood Road between Moraga and Castro Valley is like a little brother to Big Sur Highway One: it keeps imitating its bigger brother by also repeatedly collapsing whenever the rain gets heavy. It seems like it was a lifetime ago but it was only 2017 when we had a magnificently wet winter and like clockwork Highway One and Redwood Road both collapsed. It took the county a solid year to get Redwood rebuilt, one long year staring at the K-barriers below the Marciel entrance to Chabot Park.(Actually, I didn’t stare at the road closure at all because I just diverted to the Brandon Trail through Chabot Park, which also went down to the (then) Willows golf course bypassing the closure. Brandon was/is awesome, a jeep road converted into a trail that mountain bikers use as a highway to get into Chabot. That was fun while it lasted and when Redwood Road reopened I stopped using Brandon.)
Fast forward five years to January 1, 2023: torrential rains batter the Bay Area so much so that our annual Resolution Ride couldn’t take place when Mt. Diablo closed. Instead Roger and I decided to do Redwood-Norris and discovered that a huge chunk of Redwood Road had slid into the creek. We tippytoed with our bikes along the edge of the former road, now crater, safely to the other side—admittedly a stupid move—in order to continue our ride. But we knew then that given the extent of the missing road—it was completely gone for about thirty feet—this was going to be a longer closure. And it was: Redwood wasn’t reopened until this mid-February after more than twenty-five and a half months.
Friday Roger and I rode the Three Bears the ‘hard’ way (i.e. Papa Bear first) and to make it even more interesting I did the whole ride using nothing lower than a 39×23 gear. And sat grinding the whole way. Saturday I did a metric century. Sunday I was going to take the day off but Roger wanted to ride Redwood now that it’s open. The day was sunny, so what the hey, we wouldn’t be going that fast (or at least I wouldn’t!) and we hadn’t been to Redwood since New Years 2023. The best laid plans of mice and men…
Redwood is a road beloved by East Bay cyclists. It’s surrounded by open space, either regional park land or EBMUD territory—no houses, no businesses, just trees, wildland, and…lots of sports cars and motos!
About twenty years ago Mens Journal magazine published a squib touting Redwood Road as a great place to race your muscle car. Like, WTF? I was so incensed I wrote them a letter decrying their encouragement of racing on a constantly curving public road with a ton of blind corners. Things haven’t changed since and the word had apparently also gotten out to the motos and rice rocketeers that Redwood was open because despite the relative calm, we witnessed a slew of sports cars and mototastic Speed Racers careening down the road. Some love it so much they race to one end and turn around and race back and forth —we were seeing the same cars and motos over and over.
All was not lost because there were plenty of cyclists as well. So the car crowd clearly were aware they were sharing the road with slower fare and other than the screeching of rubber and roar of motors sending our adrenaline up we were otherwise unharmed.
Maybe you recall that before the Pandemic hit there were a spate of bikejackings along Skyline Blvd. in the Oakland hills. Well, long before that there was a bikejacking on Redwood Road. A cyclist was stopped by dudes with guns. They took his bike and his phone. He ended up having to walk to the Redwood Canyon fire station for help. Ever since then I’ve been very wary about cycling on Redwood alone. There’s nothing like living next to Oakland to make cycling exciting.
Two years may not seem like a long time but in the meantime I had forgotten the contour of Redwood. Considering how often we rode it I was taken aback at how much climbing it has. Maybe I’m just older (“No! Really??”) and everything seems like it has more climbing. Maybe it was because my legs were wasted after two hard days. Peaceful it was but I had tunnel vision trying to stay on Roger’s wheel. So I can’t say I noticed how beautiful it all was. Roger wasn’t exactly having a field day either since he had only recently restarted riding. But he didn’t seem slowed down by the climbs.
Eventually we passed the Marciel entrance to Anthony Chabot and the long descent to the Willows began. For many this is ‘dessert’. But for me this is a terrifying downhill. Why? Because the sightlines are good, the road is wide(r), and the pavement is decent. (Although it has noticeably degenerated since 2018 when it reopened.) For some that’s an invitation to let it all hang out and go to hell in blazes. But for me it’s like a potential disaster waiting to happen. So instead I meekly creep down the hill trying not to visualize too strongly all the possible mishaps that might—nay, shall!—occur. I never was a terror going downhill and now I’m definitely in the ‘live to fight another day’ cohort. Except I never fight another day, I just live.
We approached a section of brand new pavement; but it wasn’t the location of the total collapse. The County delayed reopening Redwood when it realized that there were two sections of the road above the collapse that also needed to be repaired; this must have been one of them. Whatever the problem it wasn’t as severe as the collapse but it apparently commanded all new asphalt.
February 9, 2025
Further down on a righthand curve we saw the repair: the whole curve had to be redone, i.e. tons of rock and earth had to be dumped to rebuild the earth beneath the road. There is probably a shit ton of pilings under there too. We were rather surprised to see this because when we crossed Redwood in 2023 it looked like there was no way you could rebuild a base since it was probably ten vertical meters of missing earth. We thought for sure they would cut into the curve to create a new road to go around the crater. Maybe that would have involved moving even more earth and a new retaining wall. Whatever the rationale someone decided to rebuild the base and boy, it’s a doozy: there is now a huge retaining wall to keep the roadway upright now. At least until the next big storm. The road collapse happened where a rivulet flows down from the left into a tributary of San Leandro Creek. Perhaps the New Year’s Day storms overwhelmed the culvert (or the culvert hadn’t been maintained, a not uncommon problem) causing the water to erode the road base. It sure looks durable.
At the bottom we stopped at the Willows to rest and take in the sunshine. We parked our butts on the benches in front of the busy driving range and watched the duffers ‘practice’ their shanks and slices. At least that’s what it looked like to me. We weren’t in the mood to get a meal at the restaurant—we’ll save that for a weekday when it’s quieter—so we headed back to Moraga.
No need to ask: of course we were wasted! It was one long slog up all those climbs. The enjoyment of the reopened road on a beautiful spring day was lost on me as I concentrated on willing my legs to spin in feeble circles.
The thing about cycling is that even when you’re tired you get somewhere eventually despite the seemingly interminable suffering. It’s just being patient and doing what you’re doing. We got to the top and no sooner had we started our ‘relaxing’ descent when Mr. Impatient tried to introduce his front bumper to my rear wheel. Yeah, I’m fuckin’ going slow. And no, I’m not going to be a gutter bunny on this narrow, curvy downhill. I’M GOING TO FUCKIN’ TAKE THE LANE AND MAKE YOU SLOW THE FUCK DOWN. Asshole. Eventually he screeched to the left and passed us. No, you don’t need to ask: of course, it was on a blind curve with a double line divider. There is no end of impatient, careless ass craters behind the wheel, which is why there are a lot of dead cyclists and pedestrians.
Back at the manse we were both tuckered out. Yeah, it was wonderful to be reintroduced to Redwood Road after a two-year absence. But maybe I’ll try to constrain my adventures to weekdays when the sport cars and motodudes are working from home. And I’ll do it when I’m fresh rather than already tuckered out. But then again, being old means you’re tuckered out all the time!
There are days when cycling Coastside just rules and last Saturday was one of those days. The lead up had me nervous because the weather forecast turned from just cloudy to possible rain showers. The forecast in the morning was 25% PoP at 10 AM, just as we would be starting to ride. The temperature also plunged; Friday was mid-70s and Saturday morning it was mid-40s and wind. Both Roger and I pivoted back to winter wear in order to forestall a miserable chilling. All that concern turned out to be wasted energy. Yes, it was overcast but there was no precipitation and the roads were completely dry. What it probably did do was keep the crowds away from the beaches making cycling along Highway One a less dangerous and unpleasant experience.
Cycling Coastside exacts a toll for all its goodness. It’s a schlep no matter how you cut it. Getting to Pescadero from SF or Palo Alto involves a drive and if you’re from the East Bay it’s an even longer drive plus a bridge crossing. And you get to do it all over again after the ride with the extra goodness of plenty of traffic. But it’s worth it. Most of our riding is done in the urbanized Bay Area, which means abundant traffic, crowded roads, stoplights, and plenty of development. Coastside on the other hand is deserted country roads, a distinct lack of houses, business parks, stores—in fact, anything involving concrete, steel, and Plexiglas—and instead the heady aroma of green fields, farmland, eucalyptus, and coastal sage. This is the closest that road cyclists get to “green showers”. Given how close it is to the suburbs it’s strangely peaceful out there and thank goodness development has stalled along the San Mateo and Santa Cruz coast. When I was growing up in Palo Alto the Santa Clara Valley was full of farms and orchards that were pleasant to tour and you didn’t have to climb over the Coast Range to enjoy it. In fact big sections of Silicon Valley’s urbanity were still ranches and open space in the early ‘70s. I now live in Contra Costa where Walnut Creek to Pleasanton form a solid band of suburbs not unlike LA’s. In the early ’80s when Different Spokes started riding out here it still was towns separated by ranches, grass land, and open space. But all that is no more: it’s been scraped and turned into mega-burbs, and being stuck doing rides in the ever enlarging suburbs is at times completely soul gutting.
So going to Coastside is well worth the cost in time and gasoline. Apparently a lot of other cyclists agree since we saw plenty of our brethren plying the same roads we were.
There are several variations of the Pescadero loop and Saturday’s was the basic: up Stage Road to the end, down Highway One to Gazos, back on Gazos/Cloverdale, just 31 miles. A few Pescadero loops ago I added in the jaunt up to Loma Mar in order to eat at the the Loma Mar Store, which had just reopened after about a ten year closure for remodeling. That adds another ten miles altogether.
The drive down was nothing special except experiencing relief when we saw there was no rain, fog, or even dampness on the roads. It was just six of us—Stephen, Paul, Chris, Roger, me, and Jeff P., which made it easy to keep track of riders.
In the typology of rides this one is an ‘eat dessert first’—Stage Road is the experiential highlight and you do it right off the bat. No sense in delaying gratification, right? All that nonsense about earning your miles is exactly that: cut to the chase and gimme the good stuff now! The little hamlet of Pescadero was brimming with activity at 10 AM; daytrippers were crowding the local coffee shop and cyclists were already heading into Amigos Taqueria for grub. Once out of town it was back to quietude and solace. We hardly saw a car but there were plenty of cyclists. They all had smiles on their faces. Stage Road was shut down in 2023 due to a road failure and it was sorely missed. Now we’re making up for all that lost time! Stage Road has remained unchanged over the many decades I’ve lived in the Bay Area. How can that be? It’s the same farms, the road is lined by ancient, regal eucalyptus trees, with nary a structure in sight. This is what you get when you curb development: luscious open space, greenery, and calm. The two climbs on Stage go up about 400 feet each and then drop you off at San Gregorio; this time we didn’t stop until we reached the end of Stage, which has another 400-foot ascent up to Highway One.
From there is a long stretch on Highway One all the way to Gazos Creek, about 14 miles. There are two sets of rollers divided by San Gregorio Creek and then Pomponio Creek. Each has a bridge over the creek where the shoulder disappears and it’s always a challenge to keep your speed up in order to get all the way over the bridges before the SUVs barreling down the coast give you a nice punishment pass at 65+ MPH. Today the traffic was relatively light making Highway One pleasant for a change.
We made the usual pit stop at the Pigeon Point Lighthouse and noticed that all the scaffolding for the restoration has been removed. The upper stage where the light is still looks mighty rusty. You can read about the restoration here. Maybe by this time next year it will be open again! For now we had to stand outside the barricades to admire it.
On Gazos Creek Road things calmed down immediately. In fact for the entire stretch of Gazos and then Cloverdale Road we were passed by a grand total of two cars. One of those cars headed towards the end of Gazos Creek Road rather than Cloverdale perhaps to hike into Big Basin. The paved section of Gazos Creek Road ends a little beyond the turn to Cloverdale. But the road actually continues unpaved all the way into Big Basin State Park. This is a fantastic road to ride, a bit steep, because it parallels the tranquil Gazos Creek and is thoroughly wild. Maybe this year we’ll head back on a dirt ride to check on the regrowth in the Park?
Back at the cars Roger decided to drive up to Loma Mar, Jeff wanted to go to Norm’s for artichoke bread, and the rest of us rode up. Loma Mar Store was empty for a change! No line to order food and it was brought to our table “quickly” (that is, for Loma Mar Store). I was thinking of a burger but as usual I’m stuck in a rut and ordered the breakfast sandwich, which is always a winner. I’m like that six-year old who refuses to try new food and sticks with the tried-and-true. Stephen, on the other hand, his interest was piqued by the burger and was persuaded to try one after the owner professed it was truly excellent. Having noticed the homemade bread being sliced in the kitchen, he ordered a custom job rather taking the standard brioche; Chris got the ‘standard’. Paul got the soup as did I along with my sandwich (what can I say? I’m a pig!), and Roger also got a breakfast sandwich. Sitting on the outside deck conversation devolved upon the logistics of living in Paris—Paul lives part-time in Paris and Stephen was heading there for a long stay–the etymology of ‘quincaillerie’, Parisian parlance, and why Paris is the best city in the world.
How the club has changed! Perhaps it’s due to age. In the early days of the club conversation inevitably turned to gossip about various members (and their members) and who saw who at the bars last night. Then it sadly turned to who was dying and ‘had you heard the news?’ Now we talk about aches-and-pains, our latest health travesties, health and home insurance, and where we like to travel. We are now officially old farts. But what has remained unchanged is that we love to ride together albeit at a less hasty pace than when we were thirty. And the San Mateo coast has remained beautifully ageless and unchanged! Do I wish that were true of us? Perhaps not. Age and beauty are not incompatible!
In Japan laws governing cycling equipment and behavior are similar to here but there are differences. In 2023 Japan passed a law making helmets mandatory for cyclists. However there isn’t a stated penalty for failing to do so. We saw plenty of cyclists without helmets on our recent tour, which implies that the law is not enforced in any meaningful way. Whereas here you can ride with one earphone, in Japan you cannot ride with headphones or earphones at all. Your bicycle should be equipped with a front light and at least a red rear reflector. But unless you’re riding at night this won’t be enforced although you may want them anyway since you’re going to be going through tunnels. By the way lights and reflectors technically are required when riding in tunnels.
In Japan vehicles proceed on the left side of the road. Cyclists are required to do so as well. Riding against traffic, i.e. on the right side of the road, is forbidden by law but even some Japanese do it. At red lights no vehicles may turn until the light turns green, i.e. “no turn on red” is the law. This applies to bicyclists as well.
There is no three-foot (or 1.5 meter) passing law in Japan.
Riding on sidewalks is common. You should always yield the right of way to pedestrians and go slowly when there are other users. Technically when you’re cycling on the sidewalk the speed limit is 10 KPH. This may make sense in big cities such as Tokyo where there are a lot of pedestrians. In cities this mostly seemed to be true. Japanese cyclists we saw were going pretty slowly when cycling on urban sidewalks. Faster cyclists used the roadway.
In California it is not illegal for cyclists to use a phone while riding. (It might be unwise but it’s not illegal.) However in Japan you may not use a phone while riding. Here it’s also not illegal to ride two abreast (despite what many an ill-informed police officer may say, it’s not illegal according to the California Vehicle Code.) However in Japan it is definitely illegal to do so. But this is another law that is rarely enforced. Out in the countryside it’s less important mainly because car traffic is often light and intermittent. (Plus enforcement is nonexistent.)
Thinking of taking your tandem to Japan? Don’t. It’s technically illegal everywhere in Japan for two people to ride on the same bike except in Nagano prefecture. This is another law that is unlikely to be enforced. This law apparently was enacted in reaction to cyclists giving a ride to someone on a bike that was designed to carry just one person. But technically it applies to tandem bicycles. There are specific exclusions for adults who may carry up to two children on their bike.
Having a beer or sake with lunch? Don’t. The blood alcohol limit in Japan is a low 0.05%, much lower than our 0.08%, and in Japan drunk driving/cycling is a serious offense.
E-bikes. The US in the only place in the world that has a three-level e-bike classification system. Everywhere else in the world an e-bike is limited to boost only up to 25 KPH, which is about 16 MPH. This is lower than our lowest class, Class 1, which allows boost up to 20 MPH. What we term Class 2 and Class 3 e-bikes just are not available in Japan. Realistically what this will mean is that e-bikes in Japan will be slower and require more effort to propel at least on flat ground.
A note about bicycle shops. Because cycling in Japan is primarily functional—commuting, running errands, going to school and back—the typical Japanese bicycle shop is oriented towards providing service, repairs, and parts for inexpensive bicycles. Cycling here is more oriented towards recreation and more expensive bicycles. There are “pro” shops in Japan but they are primarily in cities except near recreation areas e.g. ski resorts and mountain biking centers. If your Dura Ace or Campy part breaks or you need to get that electronic shifting adjusted, you’ll be hard pressed to find help outside of an urban center.